(Pro) Fading Dots
 Fading dots is an optional step you can use to further improve the look of your photo mix. This is a more advanced feature which requires
Morpheus Photo Mixer Mac Professional as well as having beginner mode menus unchecked.
Fading dots is an optional step you can use to further improve the look of your photo mix. This is a more advanced feature which requires
Morpheus Photo Mixer Mac Professional as well as having beginner mode menus unchecked.
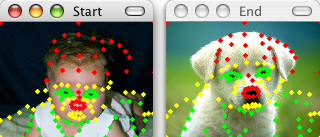
For this example, we are starting with a different photo mix as pictured here. This sample layout also comes included with Morpheus Photo Mixer Mac in its final
form for you to play around with.
 With just the default options, Morpheus Photo Mixer Mac mixes the two pictures 50/50, combining all of the features from each image together into one. If you
want to use specific features entirely from one picture for some parts, and features from the other picture for other parts, then you will need to use
the "Fade Selected Dots" option.
With just the default options, Morpheus Photo Mixer Mac mixes the two pictures 50/50, combining all of the features from each image together into one. If you
want to use specific features entirely from one picture for some parts, and features from the other picture for other parts, then you will need to use
the "Fade Selected Dots" option.
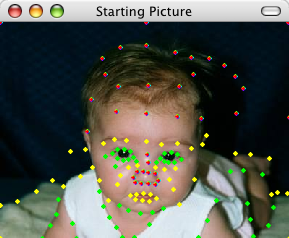 First, use the Select Dots tool to select the dots near the picture features you want to come from just one of the pictures. Here we are selecting
all of the red dots around the top of the head and nose.
First, use the Select Dots tool to select the dots near the picture features you want to come from just one of the pictures. Here we are selecting
all of the red dots around the top of the head and nose.
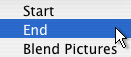 With the dots still selected, click on the "Fade Selected Dots" button on the toolbar and pick End. By default, all dots are faded to Blend Pictures.
We want the head and nose features to come from the picture of the dog, which is in the picture window labeled End, which is why we selected End
from the three choices.
With the dots still selected, click on the "Fade Selected Dots" button on the toolbar and pick End. By default, all dots are faded to Blend Pictures.
We want the head and nose features to come from the picture of the dog, which is in the picture window labeled End, which is why we selected End
from the three choices.
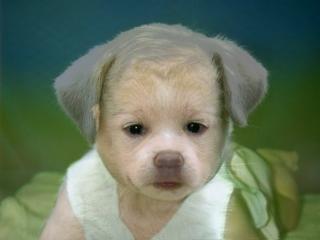
 Next, we repeat the same process for the green dots, but fade those to Start so most of the rest of the baby picture will come through. The yellow
dots where left at the default of Blend Pictures to create a smoother transition between the various parts of the photo mix. Here you can see the
final mix of a baby with a dog nose and dog ears.
Next, we repeat the same process for the green dots, but fade those to Start so most of the rest of the baby picture will come through. The yellow
dots where left at the default of Blend Pictures to create a smoother transition between the various parts of the photo mix. Here you can see the
final mix of a baby with a dog nose and dog ears.