The basic concept is to create a morph transitioning between two pictures and create a movie file of your animation.
 Start by using the first option on the wizard to create a new layout. The wizard will guide you through picture loading, and then give you
more detailed steps to help you get started on your morph.
Start by using the first option on the wizard to create a new layout. The wizard will guide you through picture loading, and then give you
more detailed steps to help you get started on your morph.
 Place Dots - Click on the "Add Dots" tool, then click anywhere on the first picture to add a dot. To create the best morph, try to
place dots on and around all key features of the picture. As an example, when morphing images of faces, key features are the eyes, nose, and
mouth. Remember that the more dots you place, the smoother your end result will be.
Place Dots - Click on the "Add Dots" tool, then click anywhere on the first picture to add a dot. To create the best morph, try to
place dots on and around all key features of the picture. As an example, when morphing images of faces, key features are the eyes, nose, and
mouth. Remember that the more dots you place, the smoother your end result will be.
 Adjust Dots - For every dot you place on one picture, a corresponding dot, or "partner" dot, will appear
on the other picture. You will only need to adjust the placement of each partner dot so that the key
features morph just the way you'd like them to. To move the dots around, first click on the "Move Dots" tool, then click on any dot in either
picture. Notice that the dot and its partner will both be glowing and blinking. Click on a dot and hold the mouse button down to drag the dot
to a new location. Release the mouse button when the dot is at the desired location.
Try to position the dots so that they match the key feature at which their partner dots are located on the other picture.
Adjust Dots - For every dot you place on one picture, a corresponding dot, or "partner" dot, will appear
on the other picture. You will only need to adjust the placement of each partner dot so that the key
features morph just the way you'd like them to. To move the dots around, first click on the "Move Dots" tool, then click on any dot in either
picture. Notice that the dot and its partner will both be glowing and blinking. Click on a dot and hold the mouse button down to drag the dot
to a new location. Release the mouse button when the dot is at the desired location.
Try to position the dots so that they match the key feature at which their partner dots are located on the other picture.
 Viewing Your Morph - Once you have completed placing dots on your
pictures, you can preview your morph in the "Preview" window by pressing the "Play" button. Alternatively, you can
email your morph using the "Email your morph to a friend" option under the Share menu. You can also
select "Render Timeline" from the File menu and you'll be able to export your morph in
various movie formats for display on the Internet or Email.
Viewing Your Morph - Once you have completed placing dots on your
pictures, you can preview your morph in the "Preview" window by pressing the "Play" button. Alternatively, you can
email your morph using the "Email your morph to a friend" option under the Share menu. You can also
select "Render Timeline" from the File menu and you'll be able to export your morph in
various movie formats for display on the Internet or Email.
For a complete detailed walkthrough of creating a basic morph, please see the
tutorial.

 Important tip about this help page: Many images are just thumbnails. When you move your mouse over these thumbnails and see the Enlarge arrow, simply
click the picture to display the full size image. Click the full size image to shrink it back to the thumbnail in order to read the text underneath it.
Important tip about this help page: Many images are just thumbnails. When you move your mouse over these thumbnails and see the Enlarge arrow, simply
click the picture to display the full size image. Click the full size image to shrink it back to the thumbnail in order to read the text underneath it.
[top]
 When this box is checked in the layout wizard, many advanced options will be hidden. None of the hidden options are needed to get started creating
basic morphs. If you are just learning to use Morpheus Photo Morpher Mac, it is recommended that you leave Beginner Mode Menus checked in order to
familiarize yourself with the basic options and make it easier to get started having fun.
When this box is checked in the layout wizard, many advanced options will be hidden. None of the hidden options are needed to get started creating
basic morphs. If you are just learning to use Morpheus Photo Morpher Mac, it is recommended that you leave Beginner Mode Menus checked in order to
familiarize yourself with the basic options and make it easier to get started having fun.
Morpheus Photo Morpher Mac is a powerful program which can create even more amazing morphs with the additional and more advanced options.
If you want to fully explore all of the capabilities of Morpheus Photo Morpher Mac, uncheck Beginner Mode Menus and the rest of the menu items will appear.
This option can also be set in the program's preferences under Edit / Preferences.
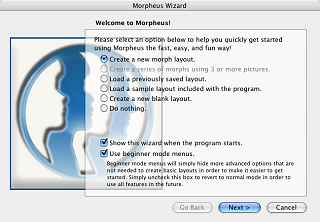
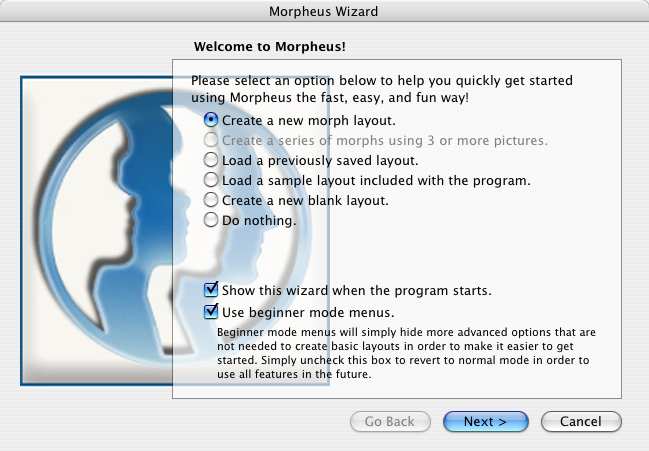
To quickly get started using Morpheus Photo Morpher Mac, use the Layout Wizard. The wizard will guide you through the creation of a new layout, or it will let you
load a previous layout or a sample layout. By default, the Layout Wizard will appear each time you start Morpheus Photo Morpher Mac, unless you disable it. You can
re-run the wizard at any time by selecting Layout Wizard from the File menu.
Typically when creating a new morph, you will select the first option, and then click Next.

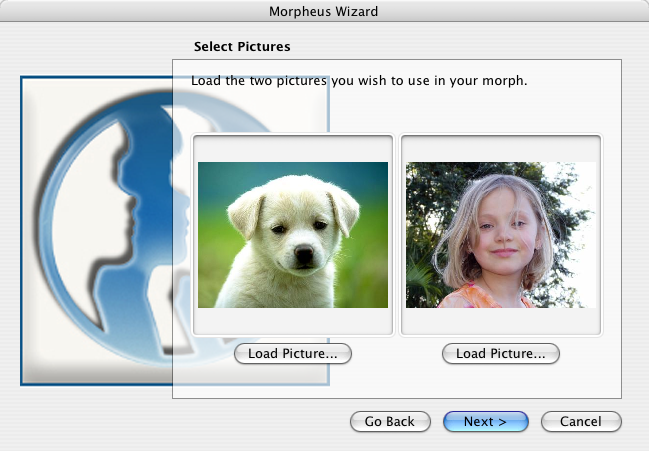 On the second page of the wizard, you should load your pictures for your morph by clicking on the Load Picture
buttons above the preview boxes. After you see the pictures that you want to use in the preview
boxes, click the Next button.
On the second page of the wizard, you should load your pictures for your morph by clicking on the Load Picture
buttons above the preview boxes. After you see the pictures that you want to use in the preview
boxes, click the Next button.
The final page of the wizard provides you with some information showing you how to add and adjust dots, and then how to view your morph.
You can press the Finish button and this information will still be available in a window off to the side.
[top]
 At the top of each picture window, you will see a toolbar. On the right side of the toolbar are some basic buttons to zoom in and out of
the pictures. There is a dropdown box in the lower right corner of each picture window to view or enter a more specific zoom value.
At the top of each picture window, you will see a toolbar. On the right side of the toolbar are some basic buttons to zoom in and out of
the pictures. There is a dropdown box in the lower right corner of each picture window to view or enter a more specific zoom value.
 The buttons on the left side of the toolbar are
the tools which you will use the majority of the time you are creating your morph. With the Zoom tool, you can click to zoom in and Control+click to
zoom out. With the Pan tool, you can click and drag to view different portions of the picture when you have zoomed in. The Move Dots tool allows you
to click and drag individual dots to move them around. The Select Dots tool allows you to drag a box around multiple dots, then click and drag any of
those dots to move the entire group around all at once. Finally, the Add Dots tool will place a new dot on the pictures every time you click the mouse.
The buttons on the left side of the toolbar are
the tools which you will use the majority of the time you are creating your morph. With the Zoom tool, you can click to zoom in and Control+click to
zoom out. With the Pan tool, you can click and drag to view different portions of the picture when you have zoomed in. The Move Dots tool allows you
to click and drag individual dots to move them around. The Select Dots tool allows you to drag a box around multiple dots, then click and drag any of
those dots to move the entire group around all at once. Finally, the Add Dots tool will place a new dot on the pictures every time you click the mouse.

 In normal mode, you will also have line tools which operate very similar to the dot tools. Connect Dots will allow you to add a new line by
connecting any two existing dots, and will not allow any new dots to be placed. Draw Free Line will place a new line to or from an existing dot,
or at any other point on the picture, where a new dot will be placed on either end of the line if needed.
In normal mode, you will also have line tools which operate very similar to the dot tools. Connect Dots will allow you to add a new line by
connecting any two existing dots, and will not allow any new dots to be placed. Draw Free Line will place a new line to or from an existing dot,
or at any other point on the picture, where a new dot will be placed on either end of the line if needed.

 There are two toolbars in the Preview window. The bottom toolbar contains familiar play and stop buttons
used to preview your morph right inside of Morpheus Photo Morpher Mac. The buttons on each side of the track bar can be used to step forward or backward one frame
at a time, and the track bar in the middle can be used to view any single frame in your morph by dragging it to the frame you want to view.
The top toolbar
has two buttons which let you preview in proof mode or in draft mode. Proof mode shows you what your morph will look like in the actual size and
detail it will be if you render it to a file or email it. Draft mode allows you to fill the Preview window and to see your morph more quickly.
There is also a display which shows you what frame number you are viewing in your animation, the time of that frame, and the total time of the
entire animation.
There are two toolbars in the Preview window. The bottom toolbar contains familiar play and stop buttons
used to preview your morph right inside of Morpheus Photo Morpher Mac. The buttons on each side of the track bar can be used to step forward or backward one frame
at a time, and the track bar in the middle can be used to view any single frame in your morph by dragging it to the frame you want to view.
The top toolbar
has two buttons which let you preview in proof mode or in draft mode. Proof mode shows you what your morph will look like in the actual size and
detail it will be if you render it to a file or email it. Draft mode allows you to fill the Preview window and to see your morph more quickly.
There is also a display which shows you what frame number you are viewing in your animation, the time of that frame, and the total time of the
entire animation.

 In normal mode, you can also toggle some preview options while in draft mode. First is the stretch button, which lets you stretch the morph
to fill the entire Preview window, or show it in its actual size. The next three buttons allow you to see the dots, lines, or triangles in the
Preview window.
In normal mode, you can also toggle some preview options while in draft mode. First is the stretch button, which lets you stretch the morph
to fill the entire Preview window, or show it in its actual size. The next three buttons allow you to see the dots, lines, or triangles in the
Preview window.

 The Timeline window (which is not available in beginner mode) has one toolbar.
With the first button, you can add a new morph to your timeline.
Preview All Frames allows you to see a thumbnail of every frame of your morph in the Timeline window.
Show Key Frames will display thumbnails of any key frames in the timeline. Key frames can exist on the exact same spot as a normal frame, or
they can occur at a time location in between two normal frames. You can use Make Key Frame to turn any picture or other frame into a key frame for
more control over your morph. Delete Key Frame will delete a key frame and all of the dot locations set in that key frame.
The Timeline window (which is not available in beginner mode) has one toolbar.
With the first button, you can add a new morph to your timeline.
Preview All Frames allows you to see a thumbnail of every frame of your morph in the Timeline window.
Show Key Frames will display thumbnails of any key frames in the timeline. Key frames can exist on the exact same spot as a normal frame, or
they can occur at a time location in between two normal frames. You can use Make Key Frame to turn any picture or other frame into a key frame for
more control over your morph. Delete Key Frame will delete a key frame and all of the dot locations set in that key frame.

 When you have a movie file loaded for any of the pictures instead of a still picture, a toolbar will
appear in a tray at the bottom of the picture window.
This toolbar lets you view any frame of the movie in the picture window by moving the track bar to the desired location. The buttons on each side of
the track bar let you step forward or backward one frame at a time, while the buttons just past those will step forward or backward one movie key
frame. The next section has two buttons for adding or deleting movie key frames for the frame you are currently viewing. Last, there is a label to
show what time position you are currently viewing and which movie key frame the dots shown in the picture window currently represent.
When you have a movie file loaded for any of the pictures instead of a still picture, a toolbar will
appear in a tray at the bottom of the picture window.
This toolbar lets you view any frame of the movie in the picture window by moving the track bar to the desired location. The buttons on each side of
the track bar let you step forward or backward one frame at a time, while the buttons just past those will step forward or backward one movie key
frame. The next section has two buttons for adding or deleting movie key frames for the frame you are currently viewing. Last, there is a label to
show what time position you are currently viewing and which movie key frame the dots shown in the picture window currently represent.
[top]
 The easiest way to load pictures is to use the Layout Wizard, which will assist you in getting started with a new layout and new pictures. If you
want to load a different picture, or are past the wizard, there are many other ways you can add pictures to your layout. The Load Picture button
allows you to load a picture into the currently active picture window, and you can also drag picture files into the picture windows
from Finder. If you are using normal mode and have the Timeline window showing, you can also drag
pictures into the picture boxes in the timeline. If you drag a picture to the empty area of the Timeline window, a new morph will be appended
automatically and the picture will be added to that. You can also drag multiple pictures at once to the Timeline window to load pictures for
multiple morphs at once.
The easiest way to load pictures is to use the Layout Wizard, which will assist you in getting started with a new layout and new pictures. If you
want to load a different picture, or are past the wizard, there are many other ways you can add pictures to your layout. The Load Picture button
allows you to load a picture into the currently active picture window, and you can also drag picture files into the picture windows
from Finder. If you are using normal mode and have the Timeline window showing, you can also drag
pictures into the picture boxes in the timeline. If you drag a picture to the empty area of the Timeline window, a new morph will be appended
automatically and the picture will be added to that. You can also drag multiple pictures at once to the Timeline window to load pictures for
multiple morphs at once.
Be sure to keep your pictures as you are working on your morph until the final morph is rendered, because only the location of the pictures
on your computer is saved in your layout when you quit Morpheus Photo Morpher Mac. If you delete or move the pictures from your computer and later try to load the
layout, Morpheus Photo Morpher Mac will be unable to locate the pictures. It will then prompt you to find them in order to properly see the morph again.
Transparent images and images with an alpha channel can be used if you check the "Morph the alpha channel" option in the Timeline Options window.
Images such as transparent GIFs and 32bit PNGs can be animated and will use the background color from the Morph Options window in conjunction
with the "Transparent threshold" to determine how the morph turns out.
When using Quicktime files as input pictures, there will be another toolbar in the main window which
you can use to preview each frame in the movie. The portion of the movie used is determined by the length of the morph in seconds, as well as
the options in the Input Movie Options window.
[top]

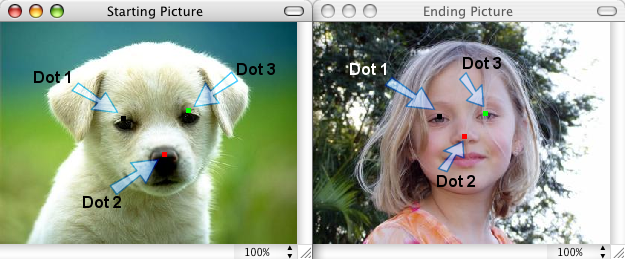 Each dot is really a pair of two dots; one on each picture. The opposite dot is referred to as a partner dot.
Each dot pair will start out at the location on the starting picture, and move through the morph to its location given on the ending picture.
For example, if you were morphing two face pictures and wanted the nose on the starting picture to morph into the nose on the ending
picture, you should make sure that the dots you place around the nose in the starting picture are the partner dots of the dots that go around
the nose in the ending picture.
Each dot is really a pair of two dots; one on each picture. The opposite dot is referred to as a partner dot.
Each dot pair will start out at the location on the starting picture, and move through the morph to its location given on the ending picture.
For example, if you were morphing two face pictures and wanted the nose on the starting picture to morph into the nose on the ending
picture, you should make sure that the dots you place around the nose in the starting picture are the partner dots of the dots that go around
the nose in the ending picture.
The more dots you place on the pictures, the smoother your end results will be. Use the Add Dots tool, then click anywhere on the picture to
add a new dot. You can also hold Option and click when using the other dot tools to quickly add a dot without switching to the Add Dot tool.
Try to match dots to features found in both pictures (such as eyes, nose, mouth, etc. if you happen to be morphing images of people, for example).
After you place your dots on the starting picture, match up the positioning of dots on both pictures
by clicking and dragging the dots while using the Move Dots tool. Notice when you hover over a normal dot
( )
that it will become highlighted with color
(
)
that it will become highlighted with color
( )
and that dot's partner dot will become highlighted in black and white
(
)
and that dot's partner dot will become highlighted in black and white
( ).
When you click on a dot to select it for moving, it will also blink
(
).
When you click on a dot to select it for moving, it will also blink
( ),
as will its partner dot
(
),
as will its partner dot
( ).
If you click on the picture, but not on a dot, the Move Dots tool will act like the Pan tool for moving around the picture when zoomed in.
).
If you click on the picture, but not on a dot, the Move Dots tool will act like the Pan tool for moving around the picture when zoomed in.
There are many combinations of keys which can be used to move dots more precisely. Shift+click will move dots only in a straight vertical or
horizontal line, while Cmd+click will select a dot without allowing any movement. When you have a dot selected, you can use the arrow keys
to move the dot one pixel at a time. Hold Shift while using the arrow keys to move 10 pixels at once. Hold Cmd and use the arrows to change
which dot is currently selected for movement. Press delete to remove that dot and its partner dot from the pictures. Also, if you Control+click on a dot,
there is a menu with some common toolbar items on it.
 To move multiple dots at once, use the Select Dots tool, then click on the picture and drag a box around the dots you want to move. Next,
click on any of the selected dots to move them all around together. To add dots to your existing selection, Shift+click directly on a dot, or
Shift+click on the picture and drag a box around some more dots. To remove dots from your selection, use Cmd instead of Shift.
To move multiple dots at once, use the Select Dots tool, then click on the picture and drag a box around the dots you want to move. Next,
click on any of the selected dots to move them all around together. To add dots to your existing selection, Shift+click directly on a dot, or
Shift+click on the picture and drag a box around some more dots. To remove dots from your selection, use Cmd instead of Shift.
With the Select Dots tool, the arrow keys work opposite to how they work with the Move Dots tool. Pressing the arrow keys will move around the
"cursor" on the dots, which may or may not be part of your selection. Hold Cmd and use to arrows to move the dots which are currently selected.
The spacebar will toggle the cursor dot in and out of the dots selected for movement.
[top]
There are several different ways which you can see your morph:
- The Preview window
- The Timeline window
- Uploading your morph to websites using the built-in upload feature
- Emailing your morph using the built-in share feature
- Rendering your morph to a file
The Preview window
The Preview window displays your morph right inside of Morpheus Photo Morpher Mac.
The play and stop buttons can be used to view your morph at any time.
The Timeline window
The Timeline window can display a thumbnail of each frame in your morph if you select the Preview All Frames option.
Uploading your morph to websites using the built-in upload feature
The "Upload your morph to a website" option under the Share menu has a helpful wizard which can upload your morph directly to
Morpheus Galleries, YouTube, or Photobucket. This allows for easy posting to blogs such as
MySpace, Facebook, Friendster, and more.
Emailing your morph using the built-in share feature
The "Email your morph to a friend" option under the Share menu has a helpful wizard to assist you in sending an email with your morph attached.
Rendering your morph to a file
The Render Timeline option under the File menu lets you export your morph in
various movie formats. It is important to note that saving your layout with the Save option under
the File menu is not the same as rendering. Your layout is your work and can be used to modify your morph in Morpheus Photo Morpher Mac in the future.
On the other hand, rendering creates a file which can be displayed in other programs, but cannot be edited in Morpheus Photo Morpher Mac.
More details about each of the ways to see your morph can be found in each respective help section.
[top]
[top]
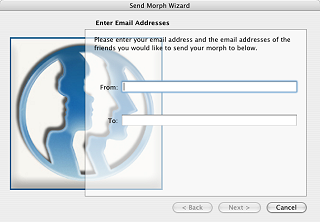
 The easiest way to email your morph is to use the wizard from right inside Morpheus Photo Morpher Mac. Select "Email your morph to a friend" from the
Share menu. On the first page, you enter your email address and the email address(es) of the friend(s) to whom you wish to send your morph.
The easiest way to email your morph is to use the wizard from right inside Morpheus Photo Morpher Mac. Select "Email your morph to a friend" from the
Share menu. On the first page, you enter your email address and the email address(es) of the friend(s) to whom you wish to send your morph.
To send to multiple friends at once, simply separate the email addresses with a comma or semicolon like this:
friendone@example.com;friendtwo@example.com. If you've used the Send Morph Wizard before, your email addresses and the friends
you've shared with will be remembered. You can select a previous friend's email address from the dropdown box if you wish.
Once you have entered or selected valid email addresses, the Next button should become clickable. If the Next button is still greyed out, that means
you have entered an invalid email address into one of the boxes, and you must correct it before continuing.
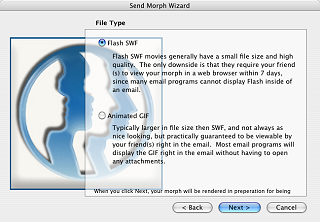
 On the second page of the wizard, you will need to choose what type of file you want to email. The default (Flash SWF) is best in most
circumstances because it will upload the fastest and it will be the highest quality. Animated GIF files can typically be viewed from inside of common
email programs instead of being sent as an attachment, but the nature of GIF files makes them a lower quality choice, so your morph may not look
as good.
On the second page of the wizard, you will need to choose what type of file you want to email. The default (Flash SWF) is best in most
circumstances because it will upload the fastest and it will be the highest quality. Animated GIF files can typically be viewed from inside of common
email programs instead of being sent as an attachment, but the nature of GIF files makes them a lower quality choice, so your morph may not look
as good.
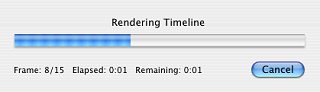
 Your morph must be rendered before it can be emailed. Once you click Next on the second page of the wizard, the rendering process will begin
automatically. When it is finished, you will see the final page of the wizard.
Your morph must be rendered before it can be emailed. Once you click Next on the second page of the wizard, the rendering process will begin
automatically. When it is finished, you will see the final page of the wizard.
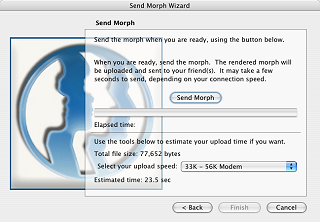
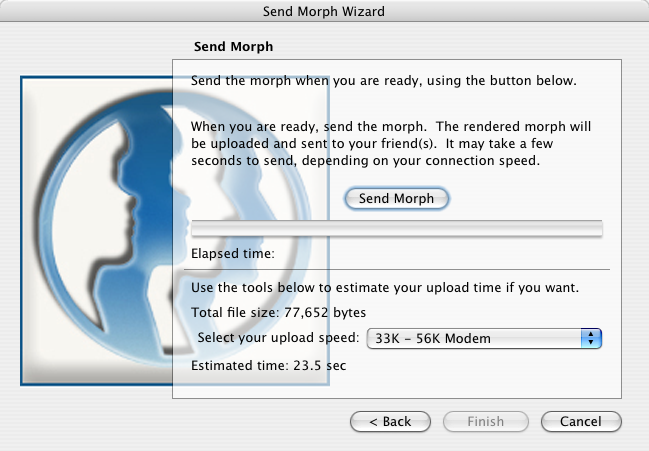 On the last page of the wizard, all you need to do is press the Send Morph button when you are ready. There is a maximum file size of
2,000,000 bytes, and any files larger than that will be rejected. If your morph is too large, you must decrease the size in the Timeline Options
window or decrease the number of frames in the Morph Options window. If you are trying to send as an Animated GIF, try Flash SWF instead.
On the last page of the wizard, all you need to do is press the Send Morph button when you are ready. There is a maximum file size of
2,000,000 bytes, and any files larger than that will be rejected. If your morph is too large, you must decrease the size in the Timeline Options
window or decrease the number of frames in the Morph Options window. If you are trying to send as an Animated GIF, try Flash SWF instead.
The bottom portion of the wizard lets you estimate how long it will take to send your email. Larger file sizes will take longer to send, but having
a faster upload speed on your internet connection will make the email send faster. It is important to know that typical residential Internet
connections have much faster download speeds than they have upload speeds, by a factor of ten to twenty at times. If you do not know how fast your
upload speed is, you can guess and pick different options as you watch the Elapsed time display when you send your email.
[top]
 Zooming in allows fine-tuning of dots for detailed morphs and zooming out allows working with large pictures on a smaller desktop size. When using
the zoom tool, each click in the picture window will double the zoom, and each Control+click will cut the zoom in half.
Zooming in allows fine-tuning of dots for detailed morphs and zooming out allows working with large pictures on a smaller desktop size. When using
the zoom tool, each click in the picture window will double the zoom, and each Control+click will cut the zoom in half.
 While using any tool at all, you can select a zoom value from the zoom dropdown on the toolbar, or just type in any zoom value you wish.
"Fit in Window" will automatically pick the largest zoom value possible without causing the need for scrollbars to appear.
While using any tool at all, you can select a zoom value from the zoom dropdown on the toolbar, or just type in any zoom value you wish.
"Fit in Window" will automatically pick the largest zoom value possible without causing the need for scrollbars to appear.
There are several other shortcuts for zooming which you can use at any time. Scrolling your mouse wheel up or pressing the plus key will zoom in by
a factor of 1.1 with each press, and scrolling down or pressing the minus key will zoom out by the same factor. The shortcut Cmd+1 will zoom
instantly to 100%, and Cmd+W will act as if "Fit in Window" was selected.
[top]
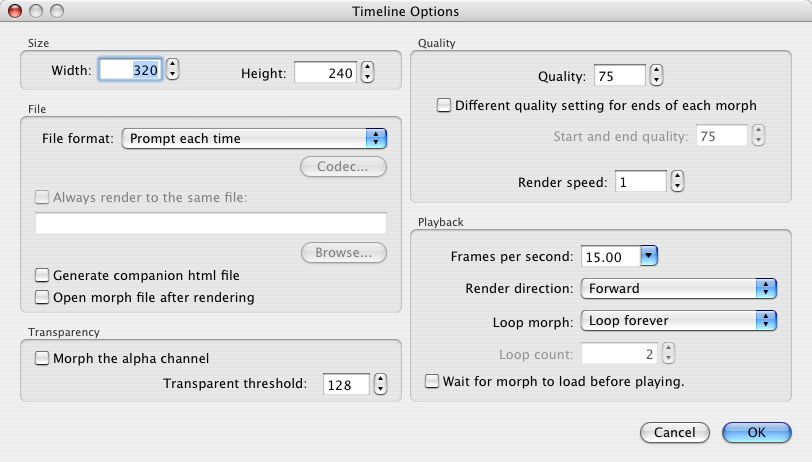 The Timeline Options window can be found by selecting Options from the Timeline menu or by pressing Cmd+I. The options here control your entire
morph across the entire timeline. More options, which can vary from morph to morph, can be found in the Morph Options window.
The Timeline Options window can be found by selecting Options from the Timeline menu or by pressing Cmd+I. The options here control your entire
morph across the entire timeline. More options, which can vary from morph to morph, can be found in the Morph Options window.
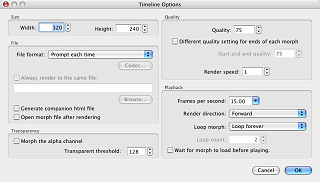
Size
The size of the timeline is the size (in pixels) that your final morph will be once you render it to a file. By default, the size is automatically
set based on the size of the pictures that you load. The Timeline menu contains a submenu called Size where you can either select automatic sizing or
set your timeline to some common sizes.
File
Normally when you render the timeline to a file, you are prompted for a file name and which file type to create. Here you can set a specific file
format to be used every time by selecting it from the dropdown.
If a specific file format is selected, you can additionally choose to always render to the same file name by checking the "Always render to the same
file" box, then by clicking Browse and entering a file name.
When "Generate companion html file" is selected, it will create an additional file when you render the timeline with the same name as the main file,
but with an html extension. The html companion file will contain a sample web page which loads the correct plugin needed to display the morph.
This is particularly useful for the Flash SWF format which is file type that can normally only be viewed on a web page with the Flash plugin.
If "Open morph file after rendering" is checked, then the newly created file will open as if you clicked on it automatically every time
you render the timeline.
Transparency
The "Morph the alpha channel" option will cause Morpheus Photo Morpher Mac to calculate a full 32bit image for each frame rendered instead of the normal 24bit image.
This allows transparency information to be preserved in the morph or at least to control when pixels show through to the background color, depending
on if the file format rendered to supports any type of transparency.
The Transparent threshold value controls the minimum value the alpha channel for a pixel can be without making that pixel entirely transparent
and become the background color. For example, a value of 0 will preserve a perfect 32bit image with all calculated translucency, suitable
for Flash SWF or PNG files. A value of 128 will make all rendered pixels with an alpha value from 0 to 127 become entirely
transparent, and alpha values 128 to 255 will be normal, which is suitable for Animated GIF files.
Not all file formats support transparency.
-
Uncompressed AVI files will be written with the alpha channel information, but it is up to the software processing the AVI to later do
anything with the information, and many programs simply discard it.
-
Flash SWF fully supports 32bit images with alpha channels.
-
Animated GIF supports a single transparent palette entry and will use the transparent threshold to calculate which pixels become transparent.
- PNG, TIFF, and Targa files fully support 32bit images with alpha channels.
- Bitmap files support 32bit images, but not many viewers recognize them as being transparent.
- JPEG and XPM files do not support any transparency at all.
Quality
The Quality option controls the compression of Flash SWF and JPEG files.
Both of these file formats are lossy, which means that they do
not store a perfect representation of the picture being saved. There is a tradeoff between file size and image quality. The lower you set the Quality,
the smaller the file size, but the worse the image will look. The higher you set the quality, the better the image will look, but it may take longer
to download or email because of the larger file size.
The "Different quality setting for ends of each morph" option lets you pick a different quality setting for the still frame(s) on each end of each
morph in your timeline. This lets you use a higher quality image for the still before and after frames, while making the file size smaller by
using a lower quality setting for the animated frames in the middle.
The Render speed should normally be left at 1, but if you have a very large morph and need to render it to a file quickly, you can set the speed
higher. Each higher render speed setting will calculate fewer and fewer pixels, resulting in a blocky picture, but noticeably speeding up the time
it takes to render the timeline.
Playback
None of the options under Playback apply to any of the still image file formats (PNG, JPG, TIFF, BMP, TGA, and XPM) unless the "Generate companion
html file" option is selected. In this case the generated html file will use javascript to animate the still images using the options specified
here.
Frames per second is one way to control the speed of your morph. Higher frames per second will result in a smoother morph but one which will
last for a shorter duration, while less frames per second will result in a more choppy morph that lasts for a longer time.
Render direction allows you to have the timeline play forward, backward, or both directions, which will have the animation play forward, then
backward back to the beginning.
Loop morph lets you decide if your animation should loop forever, play through once then stop on the last frame, or play through a certain number
of times before stopping. Some file formats, such as Quicktime movies, do not support any loop option to be
specified in the file itself, so this option will only apply if you also select "Generate companion html file" where the plugin used to play
the movie can specify the loop value. Additionally, if you
want a Quicktime movie file to play through only once, it may not stop on the final frame because
some Quicktime players will "rewind" the movie back to the starting frame for you. You can only change this
behavior in the program you are viewing the movie with.
The "Wait for morph to load before playing" option only applies to Flash SWF and still image file formats. For Flash SWF, a small progress bar will
be displayed as part of the SWF, and the morph will remain on the first frame until the entire file loads, at which point it will start playing.
For still image files, the html file will produce a similar effect using the javascript generated.
[top]

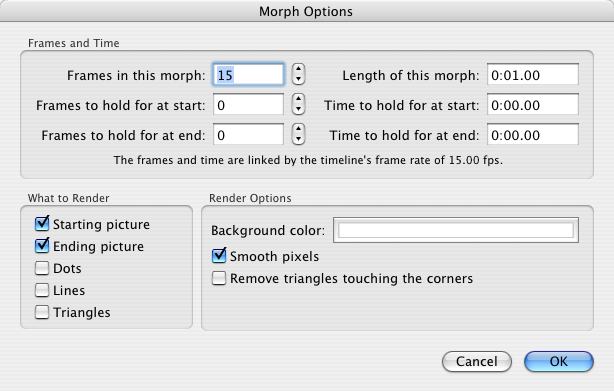 The Morph Options window can be found by selecting Options from the Morph menu, or by pressing Cmd+O. The options here control only the specific
morph for which they are set, and each morph can have different options set for it here. More options which control the entire timeline
can be found in the Timeline Options window.
The Morph Options window can be found by selecting Options from the Morph menu, or by pressing Cmd+O. The options here control only the specific
morph for which they are set, and each morph can have different options set for it here. More options which control the entire timeline
can be found in the Timeline Options window.
Frames and Time
Here you can set the length of your morph as well as the amount of time to pause on the starting and ending frames before and after the
animation plays. The three boxes on the right are linked to the three boxes on the left, and changing one side will update the other side based
on the frames per second value set in the Timeline Options window.
The number of frames in your morph affects the speed at which the animation plays. More frames will result in a longer animation which
transitions between pictures more slowly, but more frames will also result in a larger file size. Less frames will produce a smaller file size,
which can be downloaded or emailed faster, but the animation will also play through more quickly. Also see the frames per second option in the
Timeline Options for another way to control the speed of your morph.
What to Render
If you disable rendering of either picture, it will be rendered as a solid rectangle in the color of the background instead.
If you want, you can have the dots, lines, and triangle lines all rendered on top of your movie by selecting any
of the last three checkboxes.
Rendering Options
The Background color is the color that will be used if no picture is loaded, if the picture is not checked to be rendered, if "Remove triangles
touching the corners" is checked, or for any places where the pixels become transparent when the "Morph the alpha channel" option in the Timeline
Options is used.
Smooth pixels will create a much nicer looking result by interpolating rendered pixel values instead of just estimating to the nearest pixel.
If this option is unchecked, then the results may render significantly faster, but it may look more blocky in some places.
The "Remove triangles touching the corners" option will actually cause the 4 implied dots located at the corners of each picture to no longer be used
for creating the triangles. This means that you must place your own dots around the areas you want to show up, and any area not covered by a triangle
made up entirely of the dots you placed will show through to the background color.
[top]
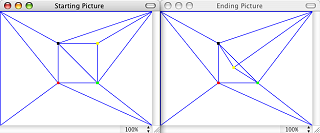
 Lines allow for more fine tuning of the creation of the triangles that actually control which portions of the starting
picture turn into which portions of the ending picture. If you enable the Show Triangles option
Lines allow for more fine tuning of the creation of the triangles that actually control which portions of the starting
picture turn into which portions of the ending picture. If you enable the Show Triangles option
 ,
then you can see all of the automatically generated triangle lines, creating the optimal triangle configuration based on the locations of all
currently placed dots.
,
then you can see all of the automatically generated triangle lines, creating the optimal triangle configuration based on the locations of all
currently placed dots.
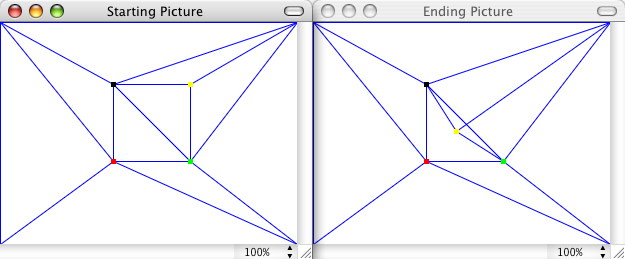
Sometimes you may want to move dots in certain positions that cause the triangles to overlap, which can create funny edges in your morph.
You can see in the example here how the yellow dot crosses over the triangle line which connects the black and green dots. Normally, you would
want to avoid doing this.
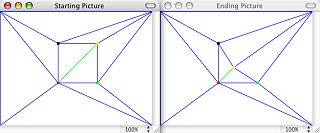
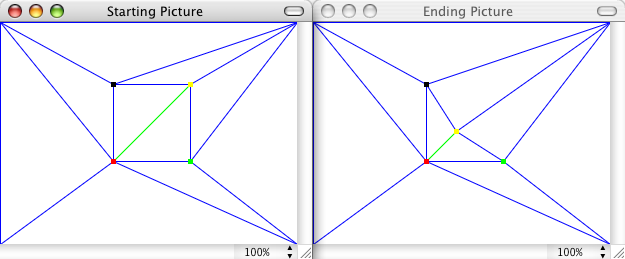 The solution to this problem is to define some lines of your own. In this case, if you add a line connecting the yellow and red dots, then the line
which connected the black and green dots will no longer be generated, and the dots can move to the same position in the ending picture without
causing overlapping triangles.
The solution to this problem is to define some lines of your own. In this case, if you add a line connecting the yellow and red dots, then the line
which connected the black and green dots will no longer be generated, and the dots can move to the same position in the ending picture without
causing overlapping triangles.
 The Move Lines tool functions just like the Move Dots tool, except it works on lines. Lines will become highlighted and blink with color, and their
partner lines will do the same in black and white. The same arrow key combinations used to move dots also works to move lines. The Delete key will
also delete a selected line.
The Move Lines tool functions just like the Move Dots tool, except it works on lines. Lines will become highlighted and blink with color, and their
partner lines will do the same in black and white. The same arrow key combinations used to move dots also works to move lines. The Delete key will
also delete a selected line.
 The Select Lines tool functions just like the Select Dots tool, except it works on lines. When dragging a selection box to select lines, only a
piece of the line must be inside the box to be selected. You do not need to drag the box around the entire length of the line.
The Select Lines tool functions just like the Select Dots tool, except it works on lines. When dragging a selection box to select lines, only a
piece of the line must be inside the box to be selected. You do not need to drag the box around the entire length of the line.
 Connect Dots will allow a new line to be placed, without creating any new dots in the process. You can either click on a dot, hold the button down,
and drag a line to any other existing dot, or you can click on a dot and let go, then click on another dot. With this tool, you do not need to
drag the mouse all the way to the second dot or click on the second dot. A dotted line will be shown from the first dot to the dot nearest the current
mouse pointer location as you move the mouse around, showing you exactly where the new line will be created. Morpheus Photo Morpher Mac will not allow two lines to
be connected to the same two dots, and attempting to do so will produce no new line.
Connect Dots will allow a new line to be placed, without creating any new dots in the process. You can either click on a dot, hold the button down,
and drag a line to any other existing dot, or you can click on a dot and let go, then click on another dot. With this tool, you do not need to
drag the mouse all the way to the second dot or click on the second dot. A dotted line will be shown from the first dot to the dot nearest the current
mouse pointer location as you move the mouse around, showing you exactly where the new line will be created. Morpheus Photo Morpher Mac will not allow two lines to
be connected to the same two dots, and attempting to do so will produce no new line.
 Draw Free Line operates similar to Connect Dots, except that you can optionally create one or two new dots in the process of adding a line. Either
end of the line you create can be on an existing dot or in any empty place on the picture, where a new dot will be created. If you
hold Shift with the first click, then only a horizontal or vertical line will be created. When using the Move Lines or Select Lines tools,
Option+click will add a line, just like it would add a dot when using the dot tools. Though this will require a second click (or a long drag from the
first click) for the other end of the line. Also, Option+Shift+click will add only a straight horizontal or vertical line.
Draw Free Line operates similar to Connect Dots, except that you can optionally create one or two new dots in the process of adding a line. Either
end of the line you create can be on an existing dot or in any empty place on the picture, where a new dot will be created. If you
hold Shift with the first click, then only a horizontal or vertical line will be created. When using the Move Lines or Select Lines tools,
Option+click will add a line, just like it would add a dot when using the dot tools. Though this will require a second click (or a long drag from the
first click) for the other end of the line. Also, Option+Shift+click will add only a straight horizontal or vertical line.
[top]
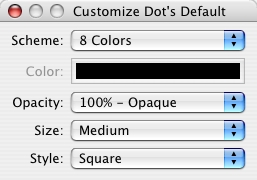 Dots and lines can be displayed in a variety of different color schemes, styles, and sizes. By default, dots are set to cycle through a set of
8 colors in a medium sized square shape. Each morph in your timeline can be given a different look for the dot's default look in that morph.
Dots and lines can be displayed in a variety of different color schemes, styles, and sizes. By default, dots are set to cycle through a set of
8 colors in a medium sized square shape. Each morph in your timeline can be given a different look for the dot's default look in that morph.
The color scheme allows you to have dots be automatically assigned a color from a set palette, have all dots be a single solid color picked from the
color button on the next line, or have the dots invert the picture behind them. Opacity can be changed to give the dots varying degrees of
translucency. There are many different styles to choose from other than a square, such as circles, crosshairs, or even just outlines of shapes.
Finally, you can adjust the size of the dots. Larger dots are easier to click on and smaller dots are easier to place more precisely.
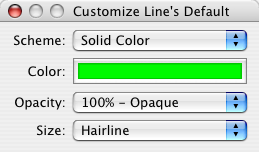 Lines can be displayed in a variety of different ways just like dots, except there is no shape selection. By default, all lines are a solid color.
 Triangles can also be customized with all the same choices as lines. All lines are also triangle lines, but when you are viewing both lines
and triangle lines in your pictures, the settings for lines will be used for the lines you placed, while the settings for triangles will be used
for the generated lines which cannot be moved.
Triangles can also be customized with all the same choices as lines. All lines are also triangle lines, but when you are viewing both lines
and triangle lines in your pictures, the settings for lines will be used for the lines you placed, while the settings for triangles will be used
for the generated lines which cannot be moved.
 In addition to being able to set a default way to display dots and lines for each morph, you can assign specific customization to dots and
lines individually by using the Customize Selected Items option under the Edit menu. While the color scheme option does not apply to customizing
a specific dot or line, there is an additional choice for each option called 'Automatic'. Selecting Automatic for any of the various options will
result in using the default settings for that morph.
In addition to being able to set a default way to display dots and lines for each morph, you can assign specific customization to dots and
lines individually by using the Customize Selected Items option under the Edit menu. While the color scheme option does not apply to customizing
a specific dot or line, there is an additional choice for each option called 'Automatic'. Selecting Automatic for any of the various options will
result in using the default settings for that morph.
 Customizing groups of dots or lines individually lets you group them to your tastes, to separate pieces of your work. For example, you could set
all the dots around the eyes in a picture of a face to one color and shape, and set the dots around the mouth to a different color and shape.
Customizing groups of dots or lines individually lets you group them to your tastes, to separate pieces of your work. For example, you could set
all the dots around the eyes in a picture of a face to one color and shape, and set the dots around the mouth to a different color and shape.
You can also use the Page Up and Page Down keys to quickly cycle through eight basic colors for dots or lines. Pressing Shift+Page Up
or Shift+Page Down will cycle through shapes for selected dots as well.
[top]
 When you are finished with your morph, you will want to render it to a file so you can view it in other programs, upload it to your webpage,
or email it to a friend. Use the Render Timeline button
When you are finished with your morph, you will want to render it to a file so you can view it in other programs, upload it to your webpage,
or email it to a friend. Use the Render Timeline button
 on the toolbar to render your morph.

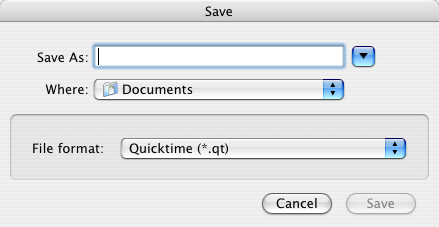
 After you select a folder and enter a file name, make sure you select the type of file you want to render to from the
"File format" dropdown at the bottom of the Save window.
After you select a folder and enter a file name, make sure you select the type of file you want to render to from the
"File format" dropdown at the bottom of the Save window.
While your animation is rendered, you will see a progress window, showing what frame number is currently being rendered, how much time has elapsed
since the rendering started, and an estimate of how much time is remaining.
It is important to note that saving your layout with the Save option
 does not do the same thing as rendering with the Render Timeline option
.
does not do the same thing as rendering with the Render Timeline option
.
Save Layout
Your layout is the work you have done so far in Morpheus Photo Morpher Mac. The picture(s) you have loaded, the placement of any dots and lines, and all options
you have set in either of the options windows are stored in your layout file when you press the Save Layout button. Morpheus Photo Morpher Mac can only load
your layout file if you want to edit your morph in the future, and not any other file type. Other programs cannot load, edit, or view the
layout files created by Morpheus Photo Morpher Mac, since the layout file format is specific to Morpheus Photo Morpher Mac.
Render Timeline
Rendering the timeline creates a movie file in a standard format which many other programs can load and view.
The files rendered by Morpheus Photo Morpher Mac cannot contain information about how you created the movie, such as where you
placed the dots, and so you cannot load these files back into Morpheus Photo Morpher Mac for future editing of your morph.
[top]
 Cut, Copy, and Paste work similar to how they work in other programs, with one important difference: When you cut or copy dots or lines, what you are
actually copying is the locations of those dots or lines on the picture. When you paste dots or lines, you will actually be pasting the locations
of the dots or lines, in effect, moving them to new locations.
Cut, Copy, and Paste work similar to how they work in other programs, with one important difference: When you cut or copy dots or lines, what you are
actually copying is the locations of those dots or lines on the picture. When you paste dots or lines, you will actually be pasting the locations
of the dots or lines, in effect, moving them to new locations.
When pasting dots or lines, the result will be different depending on whether anything is currently selected or not. When nothing is selected, all of
the dots or lines with corresponding information on the clipboard will be moved to their new locations. For any dot or line information on the
clipboard which does not have a corresponding dot or line in the picture window, a new dot or line may be placed.
When there is something selected, those selected dots or lines will be moved using the information on the clipboard. If there is information about
more dots or lines on the clipboard than there are dots or lines selected, some information from the clipboard will not be used, and only the selected
dots or lines will be moved. If there are more dots and lines selected than those on the clipboard, some of the selected dots or lines will become
unselected, and the ones that remain selected will be moved.
Copying dots will also copy information about any lines connected to any of the dots copied, and copying lines will also copy information about the
dots on each end of every line copied. Normally cutting can be thought of as copying and deleting combined into one operation, but with Morpheus Photo Morpher Mac,
copying will remember which dots or lines the locations correspond to, and cutting will not.
[top]
 The Preview window displays one frame of your morph at a time and is constantly updated as you add or move dots or
lines in the picture windows to show you what the results will look like. Toggle displaying and hiding the Preview window by pressing Cmd+P.
The Preview window displays one frame of your morph at a time and is constantly updated as you add or move dots or
lines in the picture windows to show you what the results will look like. Toggle displaying and hiding the Preview window by pressing Cmd+P.
The Play
and Stop
 buttons can be used to animate the Preview window by showing what the animation would look like when rendered to a file.
Options such as the Frames per second, Render direction, and Loop morph options in the Timeline Options window will be obeyed when playing your
animation in the Preview window. Depending on the speed of your computer, the animation may play slower than desired if frames cannot be rendered
in time. Select a faster draft speed or render your animation to a file and play that file to see the actual speed. Also, when in proof mode,
drawing Dots/Lines/Triangles is controlled by the respective options in the Morph Options window instead of by the buttons on the Preview toolbar.
buttons can be used to animate the Preview window by showing what the animation would look like when rendered to a file.
Options such as the Frames per second, Render direction, and Loop morph options in the Timeline Options window will be obeyed when playing your
animation in the Preview window. Depending on the speed of your computer, the animation may play slower than desired if frames cannot be rendered
in time. Select a faster draft speed or render your animation to a file and play that file to see the actual speed. Also, when in proof mode,
drawing Dots/Lines/Triangles is controlled by the respective options in the Morph Options window instead of by the buttons on the Preview toolbar.
The track bar can be used to move the display to any frame in any morph in the timeline. The buttons on each side of the track bar

 will move the display in the Preview window forward or backward one frame at a time. Note that all frames such as the "Frames to hold for at start"
will be shown in the Preview window exactly as they would when the animation is rendered to a file. The label below the track bar shows which frame
is currently being displayed out of the total number of frames in the entire timeline. It also displays the current time at which the frame being
shown starts being displayed, and the total length of the entire timeline in minutes and seconds in parentheses. Please note that the last frame
does not start at the time which is equal to the length of the entire timeline. In an animation, frames are displayed for a certain short duration,
and thus total length is equal to the time at which the last frame stops, not starts, being displayed.
will move the display in the Preview window forward or backward one frame at a time. Note that all frames such as the "Frames to hold for at start"
will be shown in the Preview window exactly as they would when the animation is rendered to a file. The label below the track bar shows which frame
is currently being displayed out of the total number of frames in the entire timeline. It also displays the current time at which the frame being
shown starts being displayed, and the total length of the entire timeline in minutes and seconds in parentheses. Please note that the last frame
does not start at the time which is equal to the length of the entire timeline. In an animation, frames are displayed for a certain short duration,
and thus total length is equal to the time at which the last frame stops, not starts, being displayed.
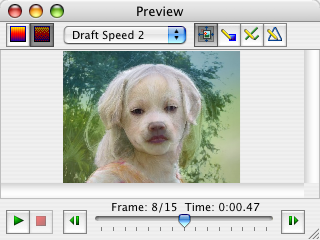
The Proof
 and Draft
 buttons change how the Preview window displays the current frame. In proof mode the rest of the buttons are disabled, and the frames are always
displayed in the exact size and quality used when rendering to a file. This may mean that the preview is displayed smaller than it could be, leaving
empty space around the edges, or that it is displayed with scrollbars if it does not all fit in the Preview window. In draft mode, the picture is
rendered faster, depending on which draft speed is selected from the menu associated with the Draft button. The higher the draft speed, the more
pixelated the Preview window will display, but the quicker the frame can be displayed.
buttons change how the Preview window displays the current frame. In proof mode the rest of the buttons are disabled, and the frames are always
displayed in the exact size and quality used when rendering to a file. This may mean that the preview is displayed smaller than it could be, leaving
empty space around the edges, or that it is displayed with scrollbars if it does not all fit in the Preview window. In draft mode, the picture is
rendered faster, depending on which draft speed is selected from the menu associated with the Draft button. The higher the draft speed, the more
pixelated the Preview window will display, but the quicker the frame can be displayed.
The Stretch to Fit
 ,
Draw Dots
,
Draw Dots
 ,
Draw Lines
,
Draw Lines
 ,
and Draw Triangles
,
and Draw Triangles
 buttons are only available in draft mode. Stretch to Fit will cause the Preview window to display the frame as large as possible without using scrollbars.
Turning Stretch to Fit off will display the frame the actual size it will be rendered, leaving empty space or using scrollbars as needed. The three
draw buttons will toggle showing the current position of the dots, lines, and triangles in the Preview window. These can be useful for
watching how the dots move from their positions on the starting pictures to their positions on the ending pictures and understanding how
the morph works.
buttons are only available in draft mode. Stretch to Fit will cause the Preview window to display the frame as large as possible without using scrollbars.
Turning Stretch to Fit off will display the frame the actual size it will be rendered, leaving empty space or using scrollbars as needed. The three
draw buttons will toggle showing the current position of the dots, lines, and triangles in the Preview window. These can be useful for
watching how the dots move from their positions on the starting pictures to their positions on the ending pictures and understanding how
the morph works.
[top]
 The Timeline window shows thumbnails of all the pictures for each morph in your layout. You can add additional morphs to the timeline by
using the first button on the Timeline toolbar. To open a picture in order to place dots or lines on it,
doubleclick on the thumbnail in the Timeline window. If you doubleclick on the morph buttons above the pictures, then both pictures for
that morph will be opened side by side. Toggle displaying and hiding the Timeline window by pressing Cmd+T.
The Timeline window shows thumbnails of all the pictures for each morph in your layout. You can add additional morphs to the timeline by
using the first button on the Timeline toolbar. To open a picture in order to place dots or lines on it,
doubleclick on the thumbnail in the Timeline window. If you doubleclick on the morph buttons above the pictures, then both pictures for
that morph will be opened side by side. Toggle displaying and hiding the Timeline window by pressing Cmd+T.
The Preview All Frames button will show a thumbnail of each frame in your morph so you can quickly see the progress of
your entire layout without needing to use the track bar in the Preview window. There are also several useful menus if you Control+click on any of the
morph, picture, or regular frame buttons in the Timeline. Doubleclicking on a regular frame thumbnail will jump to that frame in the Preview
window.
While the Timeline window shows the starting and ending pictures, and each of the frames in between when the Preview All Frames option is checked,
it does not show a button for each extra frame where the starting or ending pictures are repeated if the "Frames to hold for" options are used in
the Morph Options window.
To delete morphs from the timeline, Control+click on the morph button and select Delete. New morphs can also be inserted before or after
the selected one on the same menu.
Morphs can be linked to the previous morph in the timeline by selecting Link Morph from the Control+click menu. This will allow you to morph more than
two pictures in a direct sequence, sharing the dot and line setup between multiple morphs. Linked morphs only have one additional picture since they
share a transitional picture with the previous morph. Dots and lines on linked morphs are also partners with each picture in the entire sequence of
linked morphs. For example, with two morphs linked together, you would have three picture windows, and each dot added to any picture would appear on
all three.
The key frame options on the timeline are explained in their own section below.
[top]
Key frames allow for paths to be defined for the dots to travel across during the morph, other than the default straight line from the starting
location on the starting picture to the ending location on the ending picture. Key frames allow you to create more dynamic and flowing morphs,
instead of direct and simple transitions.
In the Timeline window, key frames can be shown or hidden by selecting the Show Key Frames button. In Morpheus Photo Morpher Mac, key frames are assigned to a certain
percentage point into the morph from 0% to 100%. To quickly add a key frame to the timeline, select Preview All Frames to see a thumbnail of
each frame in your morph, then select any of the frames and press the Make Key Frame button. This will create a key frame at the same location as
the frame button you have selected. The starting and ending pictures can also be made into key frames and will reside at exactly 0% and 100%
respectively. To remove a key frame from the timeline, select it and then press the Delete Key Frame button.
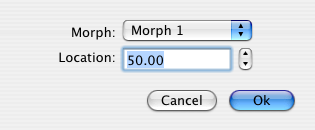 To insert a key frame at an exact point in the timeline, select Insert Key Frame from the Timeline menu. Select which morph to add the key frame
too, then enter a percentage anywhere from 0.00 to 100.00, and click OK. Key frames added this way may not line up exactly on a regular frame in
the Timeline window, but there are no downsides to that.
To insert a key frame at an exact point in the timeline, select Insert Key Frame from the Timeline menu. Select which morph to add the key frame
too, then enter a percentage anywhere from 0.00 to 100.00, and click OK. Key frames added this way may not line up exactly on a regular frame in
the Timeline window, but there are no downsides to that.
To place dots or lines on a key frame, doubleclick on the key frame button in the Timeline window. These buttons are marked with "KF:" to show
the location of the key frame in the morph. If you created a key frame at 0% or 100%, doubleclicking the button will open the starting or ending
picture as it normally would. To edit these key frames, use the Control+click menu and select Show Key Frame instead. Another way to access the key frames
is to use the [ and ] shortcut keys, which will jump one at a time between all of the key frames in one morph.
Dots and lines on key frame windows are shared between all key frames and the two pictures in the morph. Adding or deleting a dot from any picture
or key frame will also add or delete the partner dot on every other key frame and both pictures. This is because the key frames are simply reference
points for each dot to reach as it travels from the starting to the ending picture's position. Key frame windows are updated as you work to display
what that point in the morph looks like. Moving a dot on either picture window will change what all of the key frames look like, while moving a
dot on a key frame window will instantly update that key frame window to reflect the changes.

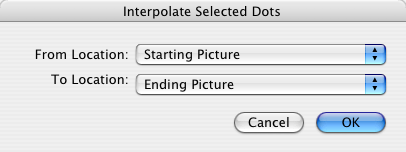 Interpolate Selected Dots is an option available under the Edit menu when you have one or more dots selected on a key frame window. This option
will allow you to automatically place dots at the position they would be at, for the correct percentage point of the current key frame interpolated
between two other key frames or pictures. For the "From location," you can select the Starting Picture, or any key frame which occurs before the
current one. For the "To location," you can select the Ending Picture, or any key frame which occurs after the current one. For example, if you have
four key frames, at 20%, 40%, 60%, and 80%, and select some dots on the 40% key frame, and select to interpolate from the 20% key frame to the 80%
key frame, then all of the dots selected will move to positions weighted by 2/3 of the coordinates of the dots on the 20% key frame, and 1/3 of the
dots on the 80% key frame. This is because the 40% key frame is twice as close (in percentage value) to the 20% key frame as it is to the 80% key
frame.
Interpolate Selected Dots is an option available under the Edit menu when you have one or more dots selected on a key frame window. This option
will allow you to automatically place dots at the position they would be at, for the correct percentage point of the current key frame interpolated
between two other key frames or pictures. For the "From location," you can select the Starting Picture, or any key frame which occurs before the
current one. For the "To location," you can select the Ending Picture, or any key frame which occurs after the current one. For example, if you have
four key frames, at 20%, 40%, 60%, and 80%, and select some dots on the 40% key frame, and select to interpolate from the 20% key frame to the 80%
key frame, then all of the dots selected will move to positions weighted by 2/3 of the coordinates of the dots on the 20% key frame, and 1/3 of the
dots on the 80% key frame. This is because the 40% key frame is twice as close (in percentage value) to the 20% key frame as it is to the 80% key
frame.
[top]
The Fade Selected Dots option
is used to set the fade for the selected dots entirely to one picture instead of the normal blending.
This will cause the morph to fade only during the portion of time between the picture and the nearest key frame, instead of fading during the
entire length of the morph. Selecting Blend Pictures will revert to the default behavior.
[top]

 The fade graphs work together with key frames to control how the dot fades from the starting picture to the ending picture on top
of the path the dot takes from one picture to another. Normally all dots fade evenly from the starting picture to the ending picture as the
morph progresses, but with the fade graphs, you can delay the fading of portions of the morph to start or end at different points in
animation, or you can even have the morph fade toward the ending picture then temporarily back to the starting picture before finishing
the morph by fading entirely to the ending picture.
The fade graphs work together with key frames to control how the dot fades from the starting picture to the ending picture on top
of the path the dot takes from one picture to another. Normally all dots fade evenly from the starting picture to the ending picture as the
morph progresses, but with the fade graphs, you can delay the fading of portions of the morph to start or end at different points in
animation, or you can even have the morph fade toward the ending picture then temporarily back to the starting picture before finishing
the morph by fading entirely to the ending picture.
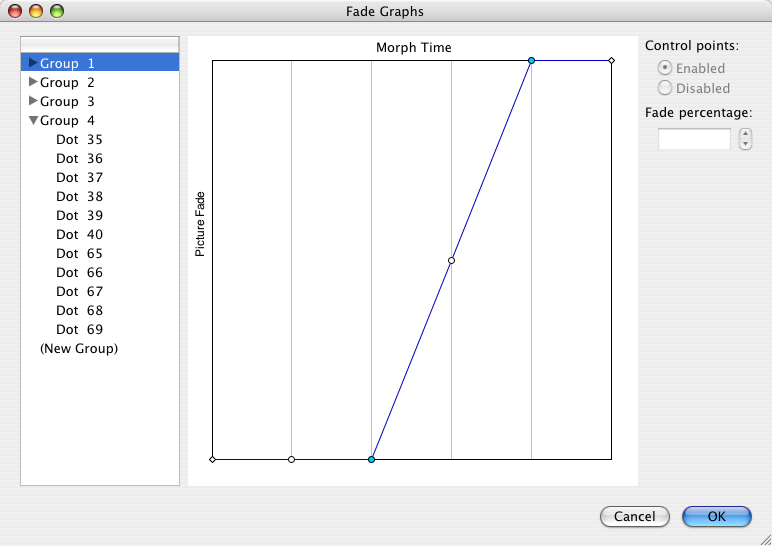
To use the fade graphs, make sure you have at least one key frame in your morph, then select Edit Fade Graphs from the Morph menu. Alternatively,
you can select some dots using the dots tools, then pick Edit Dots' Fade Graphs from the Edit menu and only those dots selected will show up in the
Fade Graphs window. When you click select any dot(s) or group(s) in the left column of the Fade Graphs window, those dots or groups of dots will all
glow in the picture windows. If you are currently using the Select Dots tool, the dots will remain selected when you close the Fade Graphs window.
Each dot in the morph will show up under one group in the left column, depending on how the fade graphs are set up for the dot. When you select
a dot or dots in a single group, the fade graph for the entire group of dots will appear in the main center area of the Fade Graphs window. When you
adjust the fade graph, you will be adjusting it for the entire single group, regardless of which dots are selected in the left column. If more than
one group is selected, you will not be able to edit the fade graphs. You can drag dots between groups, or to the (New Group) text which will create
a new group, in order to separate some dots from others and split up the various fade graphs. The group numbers are just for reference when editing
the fade graphs and they are not stored when you save your layout. If you adjust the groups and click OK, then come back later to the Fade Graphs
window, the groups may become renumbered.
The center area displays a graph which represents the timeline of the morph on the x-axis from 0% to 100%, and the fade between the starting
and ending pictures on the y-axis. A vertical line with one adjustable control point
( )
will appear for each key frame in the morph. Control points will become enabled and turn blue
(
)
will appear for each key frame in the morph. Control points will become enabled and turn blue
( )
if moved up or down on their lines. The currently selected control point shows up as orange
(
)
if moved up or down on their lines. The currently selected control point shows up as orange
( ) and can be fine tuned with the controls on the right side of the window. Disabling the control point
will cause it to move back to the automatic position between the control points on each side of it. In the lower left and upper right corners of the
graph are special control points
(
) and can be fine tuned with the controls on the right side of the window. Disabling the control point
will cause it to move back to the automatic position between the control points on each side of it. In the lower left and upper right corners of the
graph are special control points
( )
which represent the starting and ending pictures fully faded to themselves. These control points cannot be adjusted, but key frames can be added
at 0% or 100% to achieve the same effect. The blue line in the graph represents how that group of dots will fade as the morph progresses from
start to finish.
)
which represent the starting and ending pictures fully faded to themselves. These control points cannot be adjusted, but key frames can be added
at 0% or 100% to achieve the same effect. The blue line in the graph represents how that group of dots will fade as the morph progresses from
start to finish.
[top]
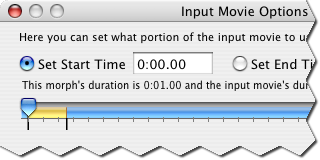 The Input Movie Options window, found under the Picture menu, is only used when using a movie instead of a still picture as the source picture.
Here you can set either the start time or the end time of the movie. Morpheus Photo Morpher Mac will never change the speed at which input movies are "played"
as they morph so if the input movie has a different frame rate than your morph has set in the Timeline Options window, frames from the
input movie will either be skipped or duplicated to keep it in sync.
The Input Movie Options window, found under the Picture menu, is only used when using a movie instead of a still picture as the source picture.
Here you can set either the start time or the end time of the movie. Morpheus Photo Morpher Mac will never change the speed at which input movies are "played"
as they morph so if the input movie has a different frame rate than your morph has set in the Timeline Options window, frames from the
input movie will either be skipped or duplicated to keep it in sync.
The track bar where you can adjust the input movie's start or end time represents the entire length of the movie file. The blue area shown inside
the track bar represents the portion of the movie used in the morph. If the blue area goes off either end of the track bar, then either
the first or last frame of the input movie will be repeated as a still frame as needed. If the duration of the morph is longer than the duration of
the input movie file, then it will be unavoidable to repeat the frame from one end of the input movie. It is recommended to use an input movie file
which is at least equal to the length of the morph.
[top]
When you have a movie file loaded as an input picture instead of a still image, the Input Movie toolbar will appear, allowing you to view different
frames from the movie and to create movie key frames as well. The track bar will allow you to view any of the frames from the input movie that are
used in the morph, which may not be every frame that is actually in the movie file. You can adjust which frames from the input movie are used
in the morph in the Input Movie Options window. The two buttons next to the track bar
will change the view forward or backward one frame at a time, and the two buttons just outside of those

 will jump forward or backward one movie key frame at a time.
Input movie key frames are different from the regular key frames added in the Timeline window. Input movie key frames help determine where the
picture information comes from on the source frames as the input movie plays through and the morph progresses. The key frames added in the
Timeline window help determine where the combined picture data is displayed in the rendered file or Preview window. The label on the end of the
toolbar shows the time of the currently displayed movie frame in the picture window, as well as the percentage point of the movie key frame currently
being manipulated in the picture window. Each movie key frame will have its own dot and line placement, and even though the positions of the dots
are interpolated between key frames, this is not shown in the picture window. The placement of the dots as shown in the picture window represents
the movie key frame nearest to the current frame, which is the percentage point shown in the label at the end of the toolbar.
There is always one undeletable movie key frame to start with, which is the regular dot placement that would exist for still images. For starting
pictures this undeletable movie key frame will be at 0.00%, and for ending pictures it will be at 100.00%. Additional movie key frames can be added
at the current frame by pressing the Create Key Frame button
 on the Input Movie toolbar. The currently displayed movie key frame can deleted by pressing the Delete Key Frame button
 ,
unless the current key frame is the special undeletable one.
,
unless the current key frame is the special undeletable one.
The Interpolate Selected Dots option under the Edit menu works for movie key frames as well, except for the special undeletable key frame.
For movie key frames, you can interpolate dot positions from surrounding movie key frames, or from the starting or ending pictures. If you
interpolate positions and select the starting or ending picture from either dropdown, and that picture is a movie instead of a still image, then
the dot positions used to interpolate from will be from the special movie key frame at 0.00% or 100.00%.
[top]
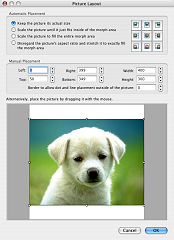
 The Picture Layout window, not to be confused with the layout file where your work is saved, allows you to place your picture inside or around the
morph area. The morph area is the width and height of your morph, as defined in the Timeline Options window. By default, all pictures will be
stretched to fill the morph area exactly, even if that distorts the pictures by changing their aspect ratio. The Picture Layout is available under
the Picture menu or by pressing Cmd+L.
The Picture Layout window, not to be confused with the layout file where your work is saved, allows you to place your picture inside or around the
morph area. The morph area is the width and height of your morph, as defined in the Timeline Options window. By default, all pictures will be
stretched to fill the morph area exactly, even if that distorts the pictures by changing their aspect ratio. The Picture Layout is available under
the Picture menu or by pressing Cmd+L.
The buttons under the Automatic Placement section allow for quick placement of the picture and they will adjust the boxes in the Manual Placement
section when used. "Keep the picture its actual size" will allow you to size the image in the morph area based on the actual size of the picture file
itself. With this option, you can center the picture or have it placed flush against any edge or corner of the morph area. "Scale the picture until
it just fits inside of the morph area" will shrink or enlarge the picture as much as possible to fit the entire image inside of the morph area, without
cutting anything off. This may leave empty space on two of the edges if the picture's aspect ratio does not match the aspect ratio of the morph.
"Scale the picture to fill the entire morph area" is similar to the previous option, but may cut the picture off on two edges instead of leaving
empty space in the morph area. The last option, "Disregard the picture's aspect ratio and stretch it to exactly fill the morph area" will position
the picture the default way which takes up all available space without cutting off any part of the picture or leaving any empty space. This may cause
the picture to look distorted if the aspect ratios do not match.
If none of these common options are quite what you want, you can easily click and drag the picture around in the preview area at the bottom.
The white box represents the available morph area, and the grey area around that represents areas which will be hidden. Click and drag any of
the picture's corners or edges to resize it any way you like. To fine tune the placement of the picture, you can adjust the boxes under the
Manual Placement section.
It is important to note that areas of the picture which are hidden in the picture layout because they are outside of the morph area may not remain
hidden throughout the animation. The frames in between the starting and ending pictures will interpolate the picture layout between the positions set
for each of the pictures. For example, if you completely hide the starting picture off the left edge of the morph area, and completely hide the
ending picture off the right edge of the morph area, you will see the morph pan in from the left and exit to the right when playing the resulting
animation.
The other option inside of the Manual Placement section, "Border to allow dot and line placement outside of the picture," will add a transparent area
around the pictures in the picture windows, so that dots and lines can be placed outside of the normal dimensions of the pictures. This allows for
more fluid movement of parts of the pictures as they move in and out of the morph area. Normally dots can only be placed up to the edges of the
pictures which may result in parts of the animation "flattening out" against those edges if a certain degree of movement is desired for the dots.
[top]
Many things that can be done in Morpheus Photo Morpher Mac by using the mouse can also be done by using keyboard shortcuts or other alternative methods.
| General Shortcuts |
| Cmd+S |
Save Layout |
| Cmd+R |
Render Timeline |
| Cmd+Z |
Undo last operation |
| Cmd+Y |
Redo last undone operation |
| Cmd+I |
Timeline Options |
| Cmd+P |
Toggle Preview window |
| Cmd+T |
Toggle Timeline window |
| F1 |
Help |
| Option+Left/Right |
Forward/Backward 1 frame in the Preview window |
| Shift+Option+Left/Right |
Forward/Backward 1 morph in the Preview window |
| Cmd+Option+Left/Right |
Jump to first/last frame in the Preview window |
| Per-Picture Shortcuts |
| Cmd+O |
Morph Options |
| Cmd+L |
Picture Layout |
| Cmd+1 |
Zoom to 100% |
| Cmd+W |
Zoom to automatically fit in window |
| Mouse Wheel Up / + |
Zoom in |
| Mouse Wheel Down / - |
Zoom out |
| Enter |
Jump back and forth between the two picture windows |
| [ / ] |
Jump between the picture windows and key frame windows |
| < / > |
Forward/Backward 1 movie key frame |
| Tool Shortcuts |
| P |
Pan |
| Z |
Zoom |
| D |
Move Dots |
| S |
Select Dots |
| A |
Add Dots |
| L |
Move Lines |
| E |
Select Lines |
| C |
Connect Dots |
| F |
Draw Free Line |
| Move or Select Dots or Lines Shortcuts |
| Cmd+X |
Cut dots/lines positions |
| Cmd+C |
Copy dots/lines positions |
| Cmd+V |
Paste dots/lines positions |
| Delete |
Delete dots/lines |
| Cmd+A |
Select all dots/lines |
| Cmd+D / ESC |
Deselect all dots/lines |
| Cmd+U |
Customize selected dots/lines |
| Page Up/Down |
Change selected dots/lines color |
| Shift+Page Up/Down |
Change selected dots style |
| Option+Click |
Add dot or draw free line |
| Shift+Option+Click |
Draw free straight hroizontal or vertical line |
| Move Dots or Lines Shortcuts |
| Click+Drag Dot/Line |
Select a single dot/line and move it |
| Click+Drag Picture |
Deselect dot/line and pan picture |
| Shift+Click+Drag Dot/Line |
Select a single dot/line and move it only in a straight horizontal or vertical line |
| Cmd+Click Dot/Line |
Select a single dot/line without being able to move it |
| Arrow Keys |
Move dot/line by 1 pixel |
| Shift+Arrows |
Move dot/line by 10 pixels |
| Cmd+Arrows |
Move cursor to nearest dot/line |
| Cmd+Shift+Arrows |
Move cursor 10 dots/lines at a time |
| Select Dots or Lines Shortcuts |
| Click+Drag Picture |
Set a new selection by dragging a rectangle around dots/lines |
| Click+Drag Selected Dot/Line |
Move dots/lines |
| Click+Drag Unselected Dot/Line |
Select just that dot/line and move it |
| Shift+Click+Drag Picture |
Add dots/lines inside rectangle to selection |
| Shift+Click+Drag Dot/Line |
Add dot/line to selection and move entire selection |
| Cmd+Click+Drag Picture |
Remove dots/lines inside rectangle from selection |
| Cmd+Click Dot/Line |
Remove dot/line from selection |
| Arrow Keys |
Move cursor to nearest dot/line |
| Shift+Arrows |
Move cursor 10 dots/lines at a time |
| Cmd+Arrows |
Move selected dots/lines by 1 pixel |
| Cmd+Shift+Arrows |
Move selected dots/lines by 10 pixels |
| Spacebar |
Toggle the cursor dot/line in and out of the selection |
| Draw Free Line Shortcuts |
| Shift+Click |
Draw straight horizontal or vertical line |
Also, Control+click in the picture windows, on dots and lines, on any of the buttons in the Timeline window, or on any of the toolbars at the top of the
main window for helpful popup menus.
[top]
Please run through the tutorial, read the FAQ, and play around with the variety sample morphs that
come included with Morpheus Photo Morpher Mac.
If you have come to this point and you still have questions or if you would like to suggest a feature, feel free to
visit our support forums and we will do our best to assist you in making your experience with Morpheus Photo Morpher Mac a great one.
Thank you for using Morpheus Photo Morpher Mac.
[top]
 26. Additional Help