|
|
Adding Dots
Notice that a corresponding "partner" dot will appear automatically in the opposite picture window, for every dot that you add to a picture.
The most recently added dot will glow with a colorful outline, and its partner dot will glow with a black and white outline. This lets you
easily see where the dots have been added. Notice how the partner dots appear in the same location on the ending picture as they do in the starting
picture window. These partner dots will need to be adjusted by you (on the next step of this tutorial) so that they
are situated appropriately on the same key elements of the other picture.
|
| Copyright © 1999 - 2026 Morpheus Development, LLC. All Rights Reserved Privacy - Purchase Terms |
 Once you finish the Layout Wizard you will be brought into Morpheus Photo Morpher Mac with a new layout containing your pictures similar to
what is shown here.
The two pictures are labeled above each picture window showing you which picture your morph will start with and
which picture it will end with.
Once you finish the Layout Wizard you will be brought into Morpheus Photo Morpher Mac with a new layout containing your pictures similar to
what is shown here.
The two pictures are labeled above each picture window showing you which picture your morph will start with and
which picture it will end with.
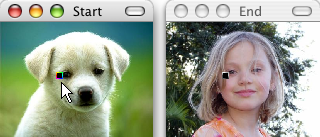 In this example, we'll start by placing a dot near the
eye of the dog
in the starting picture window, as it is good to place dots around major picture elements such as the eyes, nose, or mouth.
Simply click on the picture to add a new dot.
In this example, we'll start by placing a dot near the
eye of the dog
in the starting picture window, as it is good to place dots around major picture elements such as the eyes, nose, or mouth.
Simply click on the picture to add a new dot.
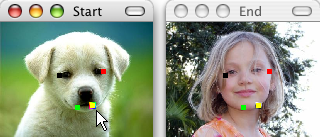 Here we have added
a dot near the other eye, and one on each side of the mouth of the dog.
The more dots you place on any elements of your pictures, the better your resulting morph will be.
Here we have added
a dot near the other eye, and one on each side of the mouth of the dog.
The more dots you place on any elements of your pictures, the better your resulting morph will be.