The basic concept is to create a mix of parts from two pictures and create a file of your combined picture.
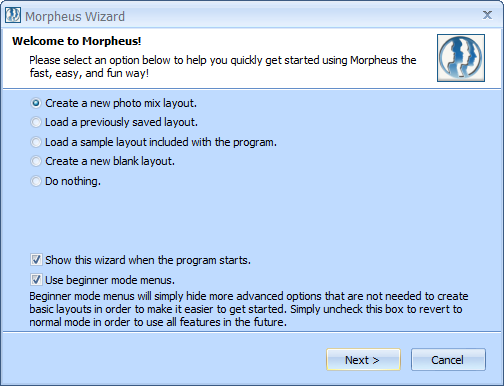 Start by using the first option on the wizard to create a new layout. The wizard will guide you through picture loading, and then give you
more detailed steps to help you get started on your photo mix.
 Place Dots - Click on the "Add Dots" tool, then click anywhere on the first picture to add a dot. To create the best photo mix, try to
place dots on and around all key features of the picture. As an example, when mixing images of faces, key features are the eyes, nose, and
mouth. Remember that the more dots you place, the smoother your end result will be.
 Adjust Dots - For every dot you place on one picture, a corresponding dot, or "partner" dot, will appear
on the other picture. You will only need to adjust the placement of each partner dot so that the key
features mix just the way you'd like them to. To move the dots around, first click on the "Move Dots" tool, then click on any dot in either
picture. Notice that the dot and its partner will both be glowing and blinking. Click on a dot and hold the mouse button down to drag the dot
to a new location. Release the mouse button when the dot is at the desired location.
Try to position the dots so that they match the key feature at which their partner dots are located on the other picture.
 Viewing Your Photo Mix - Once you have completed placing dots on your
pictures, you can preview your photo mix in the "Preview" window. Alternatively, you can
select "Render Timeline" from the File menu and you'll be able to export your photo mix in
various picture formats for display on the Internet or Email.
For a complete detailed walkthrough of creating a basic photo mix, please see the
tutorial.

 Important tip about this help page: Many images are just thumbnails. When you move your mouse over these thumbnails and see the Enlarge arrow, simply
click the picture to display the full size image. Click the full size image to shrink it back to the thumbnail in order to read the text underneath it.
[top]
 When this box is checked in the layout wizard, many advanced options will be hidden. None of the hidden options are needed to get started creating
basic photo mixes. If you are just learning to use Morpheus Photo Mixer, it is recommended that you leave Beginner Mode Menus checked in order to
familiarize yourself with the basic options and make it easier to get started having fun.
Morpheus Photo Mixer is a powerful program which can create even more amazing photo mixes with the additional and more advanced options.
If you want to fully explore all of the capabilities of Morpheus Photo Mixer, uncheck Beginner Mode Menus and the rest of the menu items will appear.
This option can also be set in the program's preferences under Edit / Preferences.

 To quickly get started using Morpheus Photo Mixer, use the Layout Wizard. The wizard will guide you through the creation of a new layout, or it will let you
load a previous layout or a sample layout. By default, the Layout Wizard will appear each time you start Morpheus Photo Mixer, unless you disable it. You can
re-run the wizard at any time by selecting Layout Wizard from the File menu.
Typically when creating a new photo mix, you will select the first option, and then click Next.
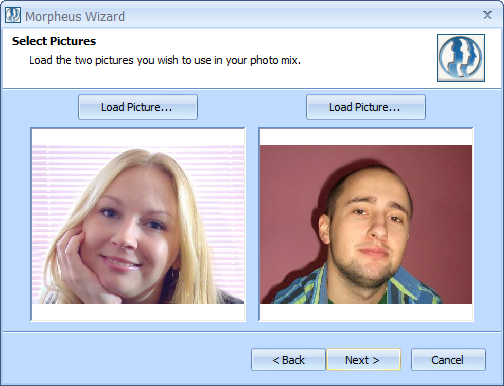 On the second page of the wizard, you should load your pictures for your photo mix by clicking on the Load Picture
buttons above the preview boxes. After you see the pictures that you want to use in the preview
boxes, click the Next button.
The final page of the wizard provides you with some information showing you how to add and adjust dots, and then how to view your photo mix.
You can press the Finish button and this information will still be available in a window off to the side.
[top]

 At the top of the main window, you will see two toolbars. The first toolbar is the Standard toolbar which contains an assortment of buttons
to make some common tasks easier. The first section of the toolbar has buttons to create a new layout, open an existing layout, save your layout for
future editing, and render your work to a file for viewing outside of Morpheus Photo Mixer. The second section of the toolbar contains buttons for undo, redo,
and cut, copy, and paste. Undo and redo allow you to undo almost any operation in Morpheus Photo Mixer and cut, copy, and paste allow you to manipulate the
dots or lines in the picture windows. Near the end of the toolbar you will find a button to load different pictures into any picture window, a
dropdown box which allows you to zoom in and out of the pictures, and a help button which can be used to display any of the various help files right
inside the program.

 If you have unchecked the beginner mode menus option, you will see a few extra options on the Standard toolbar. First, there are options to
change the color, opacity, style, and size of any dots or lines you have selected.
In the middle is a button which can be used to quickly set the fade value for any selected dots.
Also, there are toggle buttons to hide or show all of the dots, lines, and triangle lines in the picture windows.
 The large toolbar under the Standard toolbar is the Tools toolbar. This toolbar contains
the tools which you will use the majority of the time you are creating your photo mix. With the Zoom tool, you can click to zoom in and right-click to
zoom out. With the Pan tool, you can click and drag to view different portions of the picture when you have zoomed in. The Move Dots tool allows you
to click and drag individual dots to move them around. The Select Dots tool allows you to drag a box around multiple dots, then click and drag any of
those dots to move the entire group around all at once. Finally, the Add Dots tool will place a new dot on the pictures every time you click the mouse.

 In normal mode, you will also have line tools which operate very similar to the dot tools. Connect Dots will allow you to add a new line by
connecting any two existing dots, and will not allow any new dots to be placed. Draw Free Line will place a new line to or from an existing dot,
or at any other point on the picture, where a new dot will be placed on either end of the line if needed.
 The toolbar in the Preview window
has two buttons which let you preview in proof mode or in draft mode. Proof mode shows you what your photo mix will look like in the actual size and
detail it will be if you render it to a file or email it. Draft mode allows you to fill the Preview window and to see your photo mix more quickly.

 In normal mode, you can also toggle some preview options while in draft mode. First is the stretch button, which lets you stretch the photo mix
to fill the entire Preview window, or show it in its actual size. The next three buttons allow you to see the dots, lines, or triangles in the
Preview window.
Above these buttons is a track bar which lets you see the various photo mixes in your timeline, if you have more than one.
 The Timeline window (which is not available in beginner mode) has one toolbar.
With the first button, you can add a new photo mix to your timeline.
Preview All Frames allows you to see a thumbnail of every frame of your photo mix in the Timeline window.
[top]
 The easiest way to load pictures is to use the Layout Wizard, which will assist you in getting started with a new layout and new pictures. If you
want to load a different picture, or are past the wizard, there are many other ways you can add pictures to your layout. The Load Picture button
allows you to load a picture into the currently active picture window, and you can also drag picture files into the picture windows
from Windows Explorer. If you are using normal mode and have the Timeline window showing, you can also drag
pictures into the picture boxes in the timeline. If you drag a picture to the empty area of the Timeline window, a new photo mix will be appended
automatically and the picture will be added to that. You can also drag multiple pictures at once to the Timeline window to load pictures for
multiple photo mixes at once.
Be sure to keep your pictures as you are working on your photo mix until the final photo mix is rendered, because only the location of the pictures
on your computer is saved in your layout when you quit Morpheus Photo Mixer. If you delete or move the pictures from your computer and later try to load the
layout, Morpheus Photo Mixer will be unable to locate the pictures. It will then prompt you to find them in order to properly see the photo mix again.
Transparent images and images with an alpha channel can be used if you check the "Morph the alpha channel" option in the Timeline Options window.
Images such as transparent GIFs and 32bit PNGs can be animated and will use the background color from the Morph Options window in conjunction
with the "Transparent threshold" to determine how the photo mix turns out.
[top]
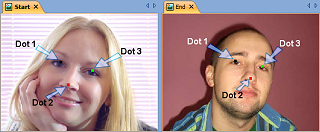
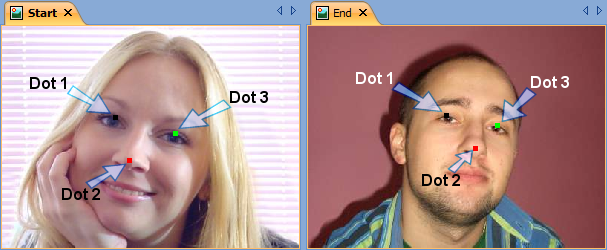 Each dot is really a pair of two dots; one on each picture. The opposite dot is referred to as a partner dot.
Each dot pair will be combined to an average location to generate your photo mix.
For example, if you were mixing two face pictures and wanted the nose on the starting picture to mix into the nose on the ending
picture, you should make sure that the dots you place around the nose in the starting picture are the partner dots of the dots that go around
the nose in the ending picture.
 The more dots you place on the pictures, the smoother your end results will be. Use the Add Dots tool, then click anywhere on the picture to
add a new dot. You can also hold Alt and click when using the other dot tools to quickly add a dot without switching to the Add Dot tool.
 Try to match dots to features found in both pictures (such as eyes, nose, mouth, etc. if you happen to be morphing images of people, for example).
After you place your dots on the starting picture, match up the positioning of dots on both pictures
by clicking and dragging the dots while using the Move Dots tool. Notice when you hover over a normal dot
(
 )
that it will become highlighted with color
(
 )
and that dot's partner dot will become highlighted in black and white
(
 ).
When you click on a dot to select it for moving, it will also blink
(
 ),
as will its partner dot
(
 ).
If you click on the picture, but not on a dot, the Move Dots tool will act like the Pan tool for moving around the picture when zoomed in.
There are many combinations of keys which can be used to move dots more precisely. Shift+click will move dots only in a straight vertical or
horizontal line, while Ctrl+click will select a dot without allowing any movement. When you have a dot selected, you can use the arrow keys
to move the dot one pixel at a time. Hold Shift while using the arrow keys to move 10 pixels at once. Hold Ctrl and use the arrows to change
which dot is currently selected for movement. Press delete to remove that dot and its partner dot from the pictures. Also, if you right-click on a dot,
there is a menu with some common toolbar items on it.
 To move multiple dots at once, use the Select Dots tool, then click on the picture and drag a box around the dots you want to move. Next,
click on any of the selected dots to move them all around together. To add dots to your existing selection, Shift+click directly on a dot, or
Shift+click on the picture and drag a box around some more dots. To remove dots from your selection, use Ctrl instead of Shift.
With the Select Dots tool, the arrow keys work opposite to how they work with the Move Dots tool. Pressing the arrow keys will move around the
"cursor" on the dots, which may or may not be part of your selection. Hold Ctrl and use to arrows to move the dots which are currently selected.
The spacebar will toggle the cursor dot in and out of the dots selected for movement.
[top]
There are several different ways which you can see your photo mix:
- The Preview window
- The Timeline window
- Uploading your photo mix to websites using the built-in upload feature
- Rendering your photo mix to a file
The Preview window
The Preview window displays your photo mix right inside of Morpheus Photo Mixer.
The photo mix is automatically updated here as you work.
The Timeline window
The Timeline window can display a thumbnail of your photo mix if you select the Preview All Frames option.
Uploading your photo mix to websites using the built-in upload feature
The "Upload your morph to a website" option under the Share menu has a helpful wizard which can upload your photo mix directly to
Morpheus Galleries, YouTube, or Photobucket. This allows for easy posting to blogs such as
MySpace, Facebook, Friendster, and more.
Rendering your photo mix to a file
The Render Timeline option under the File menu lets you export your photo mix in
various picture formats. It is important to note that saving your layout with the Save option under
the File menu is not the same as rendering. Your layout is your work and can be used to modify your photo mix in Morpheus Photo Mixer in the future.
On the other hand, rendering creates a file which can be displayed in other programs, but cannot be edited in Morpheus Photo Mixer.
More details about each of the ways to see your photo mix can be found in each respective help section.
[top]
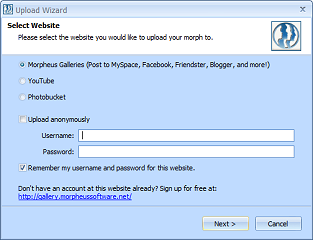
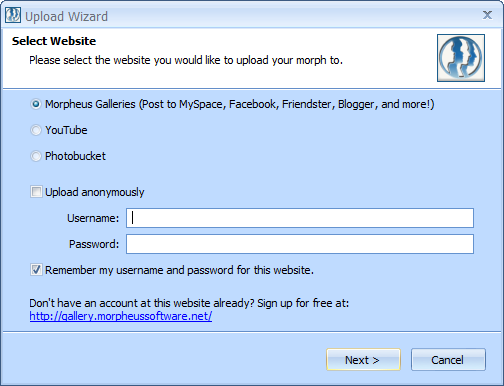 Using the built-in upload wizard, you can send your photo mixes directly to a webpage from right inside of Morpheus Photo Mixer. You can upload directly to
Morpheus Galleries, YouTube, or Photobucket.
Morpheus Galleries supports anonymous uploading so you don't even need to create an account
anywhere, as well as buttons on the webpage created for your photo mixes to quickly post your photo mix onto your favorite blog such as
MySpace or Facebook.
The upload wizard can also save your username and password for each website so that you can quickly upload multiple photo mixes each time.
Usernames and passwords are optional for Morpheus Galleries, but are required for YouTube and
Photobucket. Click the link at he bottom of the wizard if you wish to create an account at one of these sites.
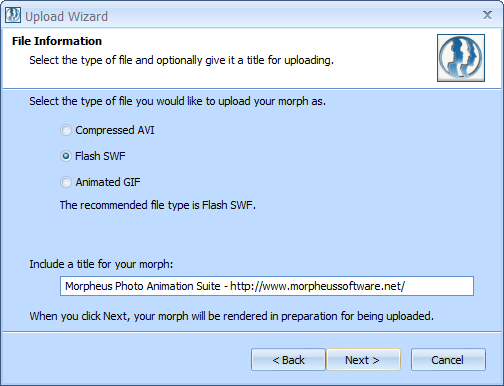 On the second page of the wizard, you will select the type of file you want to create and upload to the website. Different websites support
different formats, and some formats produce better results than others, depending on the websites.
You can also enter a short title for the photo mix on this page, which will be included with your upload.
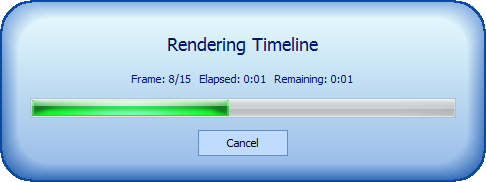 Your photo mix must be rendered before it can be uploaded. Once you click Next on the second page of the wizard, the rendering process will begin
automatically. When it is finished, you will see the third page of the wizard.
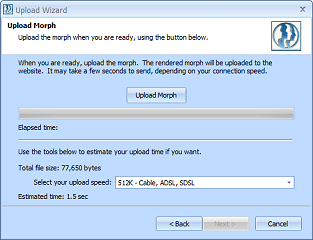
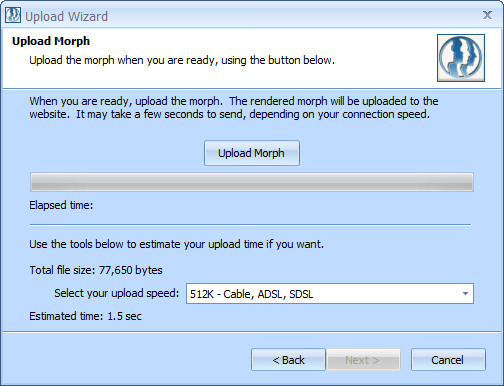 On the third page of the wizard, all you need to do is press the Upload Morph button when you are ready. Different websites may have
different maximum file sizes, so the general recommendation is to keep your file no more than 2,000,000 bytes to ensure that it is not rejected after
you upload it. If your photo mix is too large, you must decrease the size in the Timeline Options window or decrease the number of frames in the
Morph Options window. If you are trying to send as an Animated GIF, try Flash SWF instead. If you are sending a compressed movie file, try a different
codec or higher compression settings.
The bottom portion of the wizard lets you estimate how long it will take to upload your email. Larger file sizes will take longer to send, but having
a faster upload speed on your internet connection will make the upload faster. It is important to know that typical residential Internet
connections have much faster download speeds than they have upload speeds, by a factor of ten to twenty at times. If you do not know how fast your
upload speed is, you can guess and pick different options as you watch the Elapsed time display when you upload your photo mix.
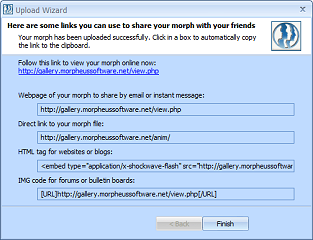
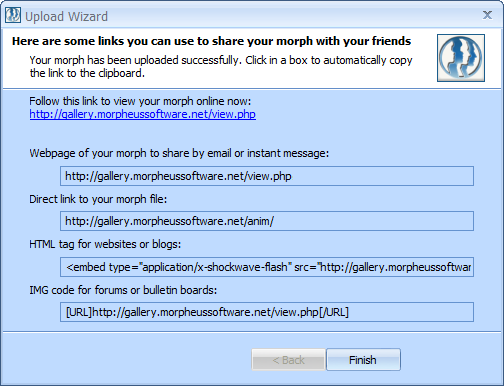 On the last page of the wizard, there are several different links to the webpage which is now hosting your photo mix. It is important to
remember that some webpages, particularly YouTube, will not display your upload until it has been processed, which can take 30 minutes or more at
times. The links shown on this page will work when YouTube makes your upload live, but may not work right away. You can always log into your YouTube
account to verify your upload is there though. Morpheus Galleries uploads are always ready to be
displayed instantly when your upload is complete.
The hyperlink at the top is a link which you can click to view the webpage of your upload directly, while the four boxes below are formatted for
easy copy and paste with various other types of websites or instant messages. Simply click in the boxes to copy the entire contents to the clipboard.
[top]
 Zooming in allows fine-tuning of dots for detailed photo mixes and zooming out allows working with large pictures on a smaller desktop size. When using
the zoom tool, each click in the picture window will double the zoom, and each right-click will cut the zoom in half.
 While using any tool at all, you can select a zoom value from the zoom dropdown on the toolbar, or just type in any zoom value you wish.
"Fit in Window" will automatically pick the largest zoom value possible without causing the need for scrollbars to appear.
There are several other shortcuts for zooming which you can use at any time. Scrolling your mouse wheel up or pressing the plus key will zoom in by
a factor of 1.1 with each press, and scrolling down or pressing the minus key will zoom out by the same factor. The shortcut Ctrl+1 will zoom
instantly to 100%, and Ctrl+W will act as if "Fit in Window" was selected.
[top]
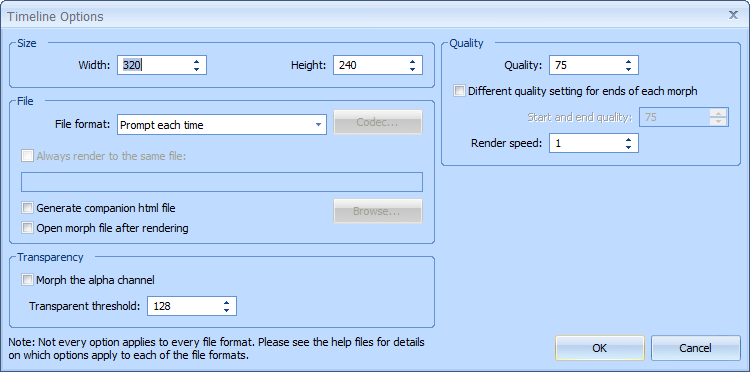 The Timeline Options window can be found by selecting Options from the Timeline menu or by pressing Ctrl+I. The options here control your entire
photo mix across the entire timeline. More options, which can vary from photo mix to photo mix, can be found in the Morph Options window.
Size
The size of the timeline is the size (in pixels) that your final photo mix will be once you render it to a file. By default, the size is automatically
set based on the size of the pictures that you load. The Timeline menu contains a submenu called Size where you can either select automatic sizing or
set your timeline to some common sizes.
File
Normally when you render the timeline to a file, you are prompted for a file name and which file type to create. Here you can set a specific file
format to be used every time by selecting it from the dropdown.
If a specific file format is selected, you can additionally choose to always render to the same file name by checking the "Always render to the same
file" box, then by clicking Browse and entering a file name.
When "Generate companion html file" is selected, it will create an additional file when you render the timeline with the same name as the main file,
but with an html extension. The html companion file will contain a sample web page which loads the correct plugin needed to display the photo mix.
If "Open morph file after rendering" is checked, then the newly created file will open as if you clicked on it automatically every time
you render the timeline.
Transparency
The "Morph the alpha channel" option will cause Morpheus Photo Mixer to calculate a full 32bit image for each frame rendered instead of the normal 24bit image.
This allows transparency information to be preserved in the photo mix or at least to control when pixels show through to the background color, depending
on if the file format rendered to supports any type of transparency.
The Transparent threshold value controls the minimum value the alpha channel for a pixel can be without making that pixel entirely transparent
and become the background color. For example, a value of 0 will preserve a perfect 32bit image with all calculated translucency, suitable
for PNG files. A value of 128 will make all rendered pixels with an alpha value from 0 to 127 become entirely
transparent, and alpha values 128 to 255 will be normal.
Not all file formats support transparency.
- PNG, TIFF, and Targa files fully support 32bit images with alpha channels.
- Bitmap files support 32bit images, but not many viewers recognize them as being transparent.
- JPEG and XPM files do not support any transparency at all.
Quality
The Quality option controls the compression of JPEG files.
The JPEG file format is lossy, which means that it does
not store a perfect representation of the picture being saved. There is a tradeoff between file size and image quality. The lower you set the Quality,
the smaller the file size, but the worse the image will look. The higher you set the quality, the better the image will look, but it may take longer
to download or email because of the larger file size.
The Render speed should normally be left at 1, but if you have a very large photo mix and need to render it to a file quickly, you can set the speed
higher. Each higher render speed setting will calculate fewer and fewer pixels, resulting in a blocky picture, but noticeably speeding up the time
it takes to render the timeline.
[top]

 The Morph Options window can be found by selecting Options from the Morph menu, or by pressing Ctrl+O. The options here control only the specific
photo mix for which they are set, and each photo mix can have different options set for it here. More options which control the entire timeline
can be found in the Timeline Options window.
What to Render
If you disable rendering of either picture, it will be rendered as a solid rectangle in the color of the background instead.
If you want, you can have the dots, lines, and triangle lines all rendered on top of your picture by selecting any
of the last three checkboxes.
Rendering Options
The Background color is the color that will be used if no picture is loaded, if the picture is not checked to be rendered, if "Remove triangles
touching the corners" is checked, or for any places where the pixels become transparent when the "Morph the alpha channel" option in the Timeline
Options is used.
Smooth pixels will create a much nicer looking result by interpolating rendered pixel values instead of just estimating to the nearest pixel.
If this option is unchecked, then the results may render significantly faster, but it may look more blocky in some places.
The "Remove triangles touching the corners" option will actually cause the 4 implied dots located at the corners of each picture to no longer be used
for creating the triangles. This means that you must place your own dots around the areas you want to show up, and any area not covered by a triangle
made up entirely of the dots you placed will show through to the background color.
The Photo Mix amount option controls how much to blend the starting picture with the ending
picture. By default they will blend 50/50, but if you set this to 0, then only the starting picture will show up, and if you set it to 100, then
only the ending picture will show up.
[top]
 Lines allow for more fine tuning of the creation of the triangles that actually control which portions of the starting
picture mix with which portions of the ending picture. If you enable the Show Triangles option
 ,
then you can see all of the automatically generated triangle lines, creating the optimal triangle configuration based on the locations of all
currently placed dots.
Sometimes you may want to move dots in certain positions that cause the triangles to overlap, which can create funny edges in your photo mix.
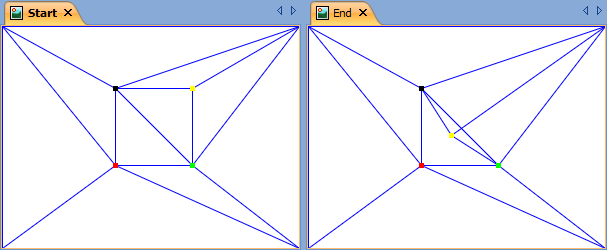
You can see in the example here how the yellow dot crosses over the triangle line which connects the black and green dots. Normally, you would
want to avoid doing this.
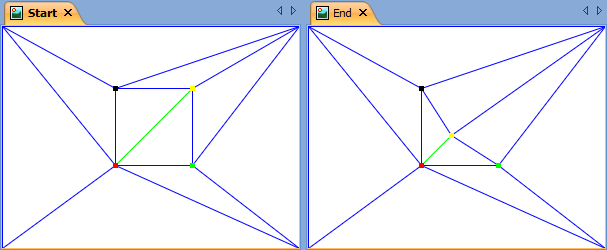 The solution to this problem is to define some lines of your own. In this case, if you add a line connecting the yellow and red dots, then the line
which connected the black and green dots will no longer be generated, and the dots can move to the same position in the ending picture without
causing overlapping triangles.
 The Move Lines tool functions just like the Move Dots tool, except it works on lines. Lines will become highlighted and blink with color, and their
partner lines will do the same in black and white. The same arrow key combinations used to move dots also works to move lines. The Delete key will
also delete a selected line.
 The Select Lines tool functions just like the Select Dots tool, except it works on lines. When dragging a selection box to select lines, only a
piece of the line must be inside the box to be selected. You do not need to drag the box around the entire length of the line.
 Connect Dots will allow a new line to be placed, without creating any new dots in the process. You can either click on a dot, hold the button down,
and drag a line to any other existing dot, or you can click on a dot and let go, then click on another dot. With this tool, you do not need to
drag the mouse all the way to the second dot or click on the second dot. A dotted line will be shown from the first dot to the dot nearest the current
mouse pointer location as you move the mouse around, showing you exactly where the new line will be created. Morpheus Photo Mixer will not allow two lines to
be connected to the same two dots, and attempting to do so will produce no new line.
 Draw Free Line operates similar to Connect Dots, except that you can optionally create one or two new dots in the process of adding a line. Either
end of the line you create can be on an existing dot or in any empty place on the picture, where a new dot will be created. If you
hold Shift with the first click, then only a horizontal or vertical line will be created. When using the Move Lines or Select Lines tools,
Alt+click will add a line, just like it would add a dot when using the dot tools. Though this will require a second click (or a long drag from the
first click) for the other end of the line. Also, Alt+Shift+click will add only a straight horizontal or vertical line.
[top]
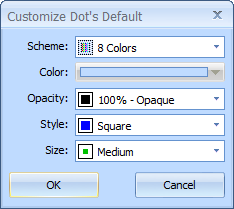 Dots and lines can be displayed in a variety of different color schemes, styles, and sizes. By default, dots are set to cycle through a set of
8 colors in a medium sized square shape. Each photo mix in your timeline can be given a different look for the dot's default look in that photo mix.
The color scheme allows you to have dots be automatically assigned a color from a set palette, have all dots be a single solid color picked from the
color button on the next line, or have the dots invert the picture behind them. Opacity can be changed to give the dots varying degrees of
translucency. There are many different styles to choose from other than a square, such as circles, crosshairs, or even just outlines of shapes.
Finally, you can adjust the size of the dots. Larger dots are easier to click on and smaller dots are easier to place more precisely.
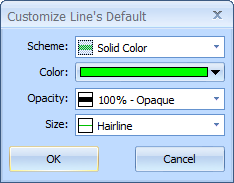 Lines can be displayed in a variety of different ways just like dots, except there is no shape selection. By default, all lines are a solid color.
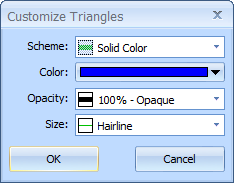 Triangles can also be customized with all the same choices as lines. All lines are also triangle lines, but when you are viewing both lines
and triangle lines in your pictures, the settings for lines will be used for the lines you placed, while the settings for triangles will be used
for the generated lines which cannot be moved.
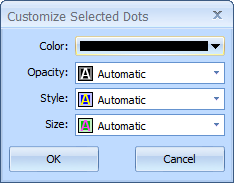 In addition to being able to set a default way to display dots and lines for each photo mix, you can assign specific customization to dots and
lines individually by using the Customize Selected Items option under the Edit menu. While the color scheme option does not apply to customizing
a specific dot or line, there is an additional choice for each option called 'Automatic'. Selecting Automatic for any of the various options will
result in using the default settings for that photo mix.
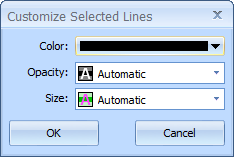 Customizing groups of dots or lines individually lets you group them to your tastes, to separate pieces of your work. For example, you could set
all the dots around the eyes in a picture of a face to one color and shape, and set the dots around the mouth to a different color and shape.
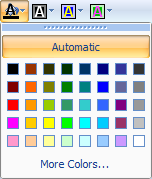 These four buttons on the toolbar will also allow you to customize selected dots and lines, just like the Customize Selected Items option.
You can also use the Page Up and Page Down keys to quickly cycle through eight basic colors for dots or lines. Pressing Shift+Page Up
or Shift+Page Down will cycle through shapes for selected dots as well.
[top]
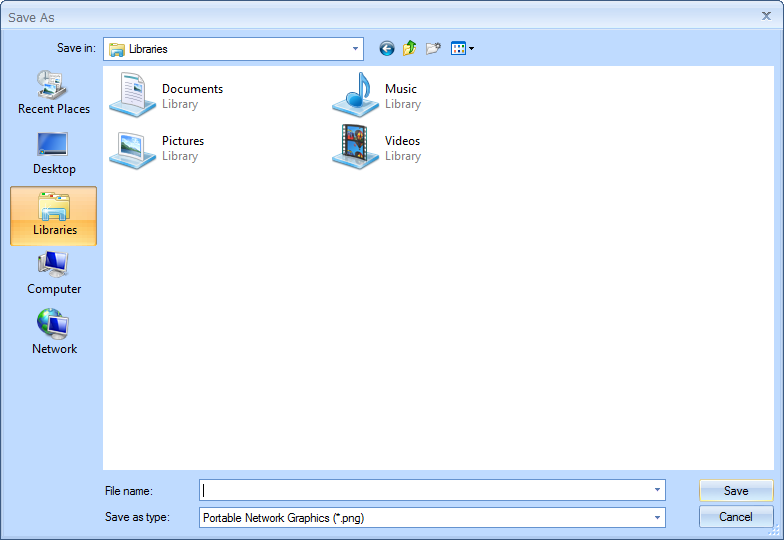 When you are finished with your photo mix, you will want to render it to a file so you can view it in other programs, upload it to your webpage,
or email it to a friend. Use the Render Timeline button
 on the toolbar to render your photo mix.

 After you select a folder and enter a file name, make sure you select the type of file you want to render to from the
"Save as type" dropdown at the bottom of the Save As window.
It is important to note that saving your layout with the Save option
 does not do the same thing as rendering with the Render Timeline option
 .
.
Save Layout
Your layout is the work you have done so far in Morpheus Photo Mixer. The picture(s) you have loaded, the placement of any dots and lines, and all options
you have set in either of the options windows are stored in your layout file when you press the Save Layout button. Morpheus Photo Mixer can only load
your layout file if you want to edit your photo mix in the future, and not any other file type. Other programs cannot load, edit, or view the
layout files created by Morpheus Photo Mixer, since the layout file format is specific to Morpheus Photo Mixer.
Render Timeline
Rendering the timeline creates a picture file in a standard format which many other programs can load and view.
The files rendered by Morpheus Photo Mixer cannot contain information about how you created the picture, such as where you
placed the dots, and so you cannot load these files back into Morpheus Photo Mixer for future editing of your photo mix.
[top]
 Cut, Copy, and Paste work similar to how they work in other programs, with one important difference: When you cut or copy dots or lines, what you are
actually copying is the locations of those dots or lines on the picture. When you paste dots or lines, you will actually be pasting the locations
of the dots or lines, in effect, moving them to new locations.
When pasting dots or lines, the result will be different depending on whether anything is currently selected or not. When nothing is selected, all of
the dots or lines with corresponding information on the clipboard will be moved to their new locations. For any dot or line information on the
clipboard which does not have a corresponding dot or line in the picture window, a new dot or line may be placed.
When there is something selected, those selected dots or lines will be moved using the information on the clipboard. If there is information about
more dots or lines on the clipboard than there are dots or lines selected, some information from the clipboard will not be used, and only the selected
dots or lines will be moved. If there are more dots and lines selected than those on the clipboard, some of the selected dots or lines will become
unselected, and the ones that remain selected will be moved.
Copying dots will also copy information about any lines connected to any of the dots copied, and copying lines will also copy information about the
dots on each end of every line copied. Normally cutting can be thought of as copying and deleting combined into one operation, but with Morpheus Photo Mixer,
copying will remember which dots or lines the locations correspond to, and cutting will not.
[top]
Some of the windows in Morpheus Photo Mixer are actually docking panes which can be attached to the sides of the window, or they can be floated on top of the
entire program. Each Docking pane has an auto hide button and a close button
 in their upper right corners. The help screens are all docking panes, and the Timeline and Preview windows are also docking panes by default.
The Timeline and Preview windows can each be made into normal windows like the picture windows by unchecking the Timeline Dockable or Preview Dockable
options under the View menu.
Closing a pane with the close button
 works just like closing a normal window. You can reshow the Timeline and Preview windows by selecting those options from the View menu. Help panes
can be reshown by selecting them from the Help menu.
When you press the auto hide button
 the docking pane will hide itself and leave behind a tab
 with its name on it. When you hover over the tab, the pane will pop back up on top of the window until you move your mouse away. If you click on
the docking pane, it will stay visible until you click on a different window or docking pane. Press the auto hide button
 again to dock the pane back in a permanent position if you no longer want it to automatically hide and show itself like this.
When you have two or more panes docked in the same location, you will also see tabs for each docking pane
 .
Only one of the panes will be visible at a time and clicking on the tabs changes which pane you see. You can also click and drag the tabs to
rearrange the order however you like.
 If you click and drag a docking pane's title, or click and drag the tab when more than one pane is docked at the same location, you can move the
pane to another location. These buttons will help you dock a pane by allowing you to drag the mouse to either one of the four edge buttons in order
to dock the pane to a particular side of the window, or to the middle button which will dock the pane with an existing pane.
 Panes can be resized when they are docked by dragging the edge; similar to how normal windows can be resized. Panes that are docked and not set to
auto hide will take up space that regular windows cannot use. So if you need more room for your picture windows, you can either shrink the size of
the docking panes or set them to auto hide.
By default, the regular windows, such as all of the picture windows, are always maximized and shown on a tab bar. The windows can be separated into
groups of tabs, and each group has left and right buttons
 to move through the tabs when many windows are open at once.
 The close button appears on the tab of any visible picture window.
 The window tabs can be clicked and dragged for reordering, or they can be dragged to other groups. Drag a tab to the edges of a group to split the
group in half, creating a new group.
If you do not like the tab groups, and want the windows to have the familiar minimize, maximize, and close buttons
 ,
you can select View / Window Tabs / No Window Tabs. With this option, windows can be moved and resized inside of the main Morpheus Photo Mixer window.
There is also the View / Window Tabs / With Regular Windows option, which will use regular windows with the minimize, maximize, and close buttons,
but it will also have a tab bar showing all open windows. This hybrid option does not allow tabs to be grouped like the default option.
Without tab groups, when a window is not maximized, you can use the Snap Window option under the Picture menu to snap the edges of the window around
the picture space, eliminating the extra border area.
When using the View / Window Tabs / With Tab Groups mode, which is the default, Arrange Icons and Windows option for the window manager will not be
available under the Window menu, because with the tab groups, all windows are always maximized. Tile Horizontally and Tile Vertically will function
to set each open window into its own group, while Cascade will place all open windows into one single group. You can still select a window for focus
from the Window menu, but clicking on the tabs in the tab bar has the same effect. The Snap Window option is also unavailable with tab groups.
The Windows skin can be changed by selecting a different skin from View / Skin. There are several varieties of skins to choose from, including a basic
one to use the native OS style instead. The functionality of the program is not affected by the skins, although some skins may have less visual
cues for hovering or dragging effects.
[top]
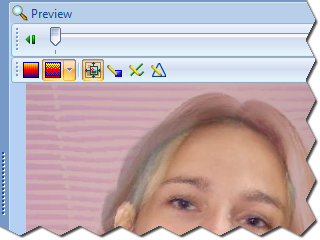 The Preview window displays one photo mix at a time and is constantly updated as you add or move dots or
lines in the picture windows to show you what the results will look like. Toggle displaying and hiding the Preview window by pressing Ctrl+P.
The track bar can be used to change which photo mix is displayed, if you have more than one in the timeline.
The Proof
 and Draft
 buttons change how the Preview window displays the current frame. In proof mode the rest of the buttons are disabled, and the frames are always
displayed in the exact size and quality used when rendering to a file. This may mean that the preview is displayed smaller than it could be, leaving
empty space around the edges, or that it is displayed with scrollbars if it does not all fit in the Preview window. In draft mode, the picture is
rendered faster, depending on which draft speed is selected from the menu associated with the Draft button. The higher the draft speed, the more
pixelated the Preview window will display, but the quicker the frame can be displayed.
The Stretch to Fit
 ,
Draw Dots
 ,
Draw Lines
 ,
and Draw Triangles
 buttons are only available in draft mode. Stretch to Fit will cause the Preview window to display the frame as large as possible without using scrollbars.
Turning Stretch to Fit off will display the frame the actual size it will be rendered, leaving empty space or using scrollbars as needed. The three
draw buttons will toggle showing the current position of the dots, lines, and triangles in the Preview window. These can be useful for
seeing where the mixed dots positions appear in the resulting photo mix.
[top]
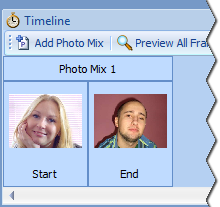 The Timeline window shows thumbnails of all the pictures for each photo mix in your layout. You can add additional photo mixes to the timeline by
using the first button on the Timeline toolbar. To open a picture in order to place dots or lines on it,
doubleclick on the thumbnail in the Timeline window. If you doubleclick on the photo mix buttons above the pictures, then both pictures for
that photo mix will be opened side by side. Toggle displaying and hiding the Timeline window by pressing Ctrl+T.
The Preview All Frames button will show a thumbnail of each photo mix so you can quickly see the progress of
your entire layout without needing to use the track bar in the Preview window. There are also several useful menus if you right-click on any of the
photo mix, picture, or regular frame buttons in the Timeline. Doubleclicking on a regular frame thumbnail will jump to that frame in the Preview
window.
To delete photo mixes from the timeline, right-click on the photo mix button and select Delete. New photo mixes can also be inserted before or after
the selected one on the same menu.
[top]
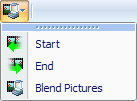 The Fade Selected Dots button
 on the Standard toolbar
is used to set the fade for the selected dots entirely to one picture instead of the normal blending.
This is most useful where you want to place a portion of one picture onto a portion of another picture, such
as putting somebody's head onto somebody else's body. By default, photo mixes will blend both pictures together, creating a composite image that is
a mix of both of the pictures. By setting certain dots to fade to the start and other dots to fade to the end, you can easily create smooth
transitions in the resulting photo mix between the portions of the mix that will come from the starting picture and the portions that come from the
ending picture.
[top]
Many things that can be done in Morpheus Photo Mixer by using the mouse can also be done by using keyboard shortcuts or other alternative methods.
| General Shortcuts |
| Ctrl+S |
Save Layout |
| Ctrl+R |
Render Timeline |
| Ctrl+Z |
Undo last operation |
| Ctrl+Y |
Redo last undone operation |
| Ctrl+I |
Timeline Options |
| Ctrl+P |
Toggle Preview window |
| Ctrl+T |
Toggle Timeline window |
| F1 |
Help |
| Alt+Left/Right |
Forward/Backward 1 frame in the Preview window |
| Ctrl+Alt+Left/Right |
Jump to first/last frame in the Preview window |
| Per-Picture Shortcuts |
| Ctrl+O |
Morph Options |
| Ctrl+1 |
Zoom to 100% |
| Ctrl+W |
Zoom to automatically fit in window |
| Mouse Wheel Up / + |
Zoom in |
| Mouse Wheel Down / - |
Zoom out |
| Enter |
Jump back and forth between the two picture windows |
| Tool Shortcuts |
| P |
Pan |
| Z |
Zoom |
| D |
Move Dots |
| S |
Select Dots |
| A |
Add Dots |
| L |
Move Lines |
| E |
Select Lines |
| C |
Connect Dots |
| F |
Draw Free Line |
| Move or Select Dots or Lines Shortcuts |
| Ctrl+X |
Cut dots/lines positions |
| Ctrl+C |
Copy dots/lines positions |
| Ctrl+V |
Paste dots/lines positions |
| Delete |
Delete dots/lines |
| Ctrl+A |
Select all dots/lines |
| Ctrl+D / ESC |
Deselect all dots/lines |
| Ctrl+U |
Customize selected dots/lines |
| Page Up/Down |
Change selected dots/lines color |
| Shift+Page Up/Down |
Change selected dots style |
| Alt+Click |
Add dot or draw free line |
| Shift+Alt+Click |
Draw free straight hroizontal or vertical line |
| Move Dots or Lines Shortcuts |
| Click+Drag Dot/Line |
Select a single dot/line and move it |
| Click+Drag Picture |
Deselect dot/line and pan picture |
| Shift+Click+Drag Dot/Line |
Select a single dot/line and move it only in a straight horizontal or vertical line |
| Ctrl+Click Dot/Line |
Select a single dot/line without being able to move it |
| Arrow Keys |
Move dot/line by 1 pixel |
| Shift+Arrows |
Move dot/line by 10 pixels |
| Ctrl+Arrows |
Move cursor to nearest dot/line |
| Ctrl+Shift+Arrows |
Move cursor 10 dots/lines at a time |
| Select Dots or Lines Shortcuts |
| Click+Drag Picture |
Set a new selection by dragging a rectangle around dots/lines |
| Click+Drag Selected Dot/Line |
Move dots/lines |
| Click+Drag Unselected Dot/Line |
Select just that dot/line and move it |
| Shift+Click+Drag Picture |
Add dots/lines inside rectangle to selection |
| Shift+Click+Drag Dot/Line |
Add dot/line to selection and move entire selection |
| Ctrl+Click+Drag Picture |
Remove dots/lines inside rectangle from selection |
| Ctrl+Click Dot/Line |
Remove dot/line from selection |
| Arrow Keys |
Move cursor to nearest dot/line |
| Shift+Arrows |
Move cursor 10 dots/lines at a time |
| Ctrl+Arrows |
Move selected dots/lines by 1 pixel |
| Ctrl+Shift+Arrows |
Move selected dots/lines by 10 pixels |
| Spacebar |
Toggle the cursor dot/line in and out of the selection |
| Draw Free Line Shortcuts |
| Shift+Click |
Draw straight horizontal or vertical line |
Also, right-click in the picture windows, on dots and lines, on any of the buttons in the Timeline window, or on any of the toolbars at the top of the
main window for helpful popup menus.
[top]
Please run through the tutorial, read the FAQ, and play around with the variety sample photo mixes that
come included with Morpheus Photo Mixer.
If you have come to this point and you still have questions or if you would like to suggest a feature, feel free to
visit our support forums and we will do our best to assist you in making your experience with Morpheus Photo Mixer a great one.
Thank you for using Morpheus Photo Mixer.
[top]
 21. Additional Help
 Start by using the first option on the wizard to create a new layout. The wizard will guide you through picture loading, and then give you
more detailed steps to help you get started on your photo mix.
 Place Dots - Click on the "Add Dots" tool, then click anywhere on the first picture to add a dot. To create the best photo mix, try to
place dots on and around all key features of the picture. As an example, when mixing images of faces, key features are the eyes, nose, and
mouth. Remember that the more dots you place, the smoother your end result will be.
 Adjust Dots - For every dot you place on one picture, a corresponding dot, or "partner" dot, will appear
on the other picture. You will only need to adjust the placement of each partner dot so that the key
features mix just the way you'd like them to. To move the dots around, first click on the "Move Dots" tool, then click on any dot in either
picture. Notice that the dot and its partner will both be glowing and blinking. Click on a dot and hold the mouse button down to drag the dot
to a new location. Release the mouse button when the dot is at the desired location.
Try to position the dots so that they match the key feature at which their partner dots are located on the other picture.

 On the second page of the wizard, you should load your pictures for your photo mix by clicking on the Load Picture
buttons above the preview boxes. After you see the pictures that you want to use in the preview
boxes, click the Next button.
 The large toolbar under the Standard toolbar is the Tools toolbar. This toolbar contains
the tools which you will use the majority of the time you are creating your photo mix. With the Zoom tool, you can click to zoom in and right-click to
zoom out. With the Pan tool, you can click and drag to view different portions of the picture when you have zoomed in. The Move Dots tool allows you
to click and drag individual dots to move them around. The Select Dots tool allows you to drag a box around multiple dots, then click and drag any of
those dots to move the entire group around all at once. Finally, the Add Dots tool will place a new dot on the pictures every time you click the mouse.
 In normal mode, you will also have line tools which operate very similar to the dot tools. Connect Dots will allow you to add a new line by
connecting any two existing dots, and will not allow any new dots to be placed. Draw Free Line will place a new line to or from an existing dot,
or at any other point on the picture, where a new dot will be placed on either end of the line if needed.
 In normal mode, you can also toggle some preview options while in draft mode. First is the stretch button, which lets you stretch the photo mix
to fill the entire Preview window, or show it in its actual size. The next three buttons allow you to see the dots, lines, or triangles in the
Preview window.
Above these buttons is a track bar which lets you see the various photo mixes in your timeline, if you have more than one.

 Each dot is really a pair of two dots; one on each picture. The opposite dot is referred to as a partner dot.
Each dot pair will be combined to an average location to generate your photo mix.
For example, if you were mixing two face pictures and wanted the nose on the starting picture to mix into the nose on the ending
picture, you should make sure that the dots you place around the nose in the starting picture are the partner dots of the dots that go around
the nose in the ending picture.
 To move multiple dots at once, use the Select Dots tool, then click on the picture and drag a box around the dots you want to move. Next,
click on any of the selected dots to move them all around together. To add dots to your existing selection, Shift+click directly on a dot, or
Shift+click on the picture and drag a box around some more dots. To remove dots from your selection, use Ctrl instead of Shift.

 Using the built-in upload wizard, you can send your photo mixes directly to a webpage from right inside of Morpheus Photo Mixer. You can upload directly to

 On the second page of the wizard, you will select the type of file you want to create and upload to the website. Different websites support
different formats, and some formats produce better results than others, depending on the websites.

 Your photo mix must be rendered before it can be uploaded. Once you click Next on the second page of the wizard, the rendering process will begin
automatically. When it is finished, you will see the third page of the wizard.

 On the third page of the wizard, all you need to do is press the Upload Morph button when you are ready. Different websites may have
different maximum file sizes, so the general recommendation is to keep your file no more than 2,000,000 bytes to ensure that it is not rejected after
you upload it. If your photo mix is too large, you must decrease the size in the Timeline Options window or decrease the number of frames in the
Morph Options window. If you are trying to send as an Animated GIF, try Flash SWF instead. If you are sending a compressed movie file, try a different
codec or higher compression settings.

 On the last page of the wizard, there are several different links to the webpage which is now hosting your photo mix. It is important to
remember that some webpages, particularly YouTube, will not display your upload until it has been processed, which can take 30 minutes or more at
times. The links shown on this page will work when YouTube makes your upload live, but may not work right away. You can always log into your YouTube
account to verify your upload is there though.
  Zooming in allows fine-tuning of dots for detailed photo mixes and zooming out allows working with large pictures on a smaller desktop size. When using
the zoom tool, each click in the picture window will double the zoom, and each right-click will cut the zoom in half.
 While using any tool at all, you can select a zoom value from the zoom dropdown on the toolbar, or just type in any zoom value you wish.
"Fit in Window" will automatically pick the largest zoom value possible without causing the need for scrollbars to appear.

 The Timeline Options window can be found by selecting Options from the Timeline menu or by pressing Ctrl+I. The options here control your entire
photo mix across the entire timeline. More options, which can vary from photo mix to photo mix, can be found in the Morph Options window.

 The Morph Options window can be found by selecting Options from the Morph menu, or by pressing Ctrl+O. The options here control only the specific
photo mix for which they are set, and each photo mix can have different options set for it here. More options which control the entire timeline
can be found in the Timeline Options window.

 Lines allow for more fine tuning of the creation of the triangles that actually control which portions of the starting
picture mix with which portions of the ending picture. If you enable the Show Triangles option

 The solution to this problem is to define some lines of your own. In this case, if you add a line connecting the yellow and red dots, then the line
which connected the black and green dots will no longer be generated, and the dots can move to the same position in the ending picture without
causing overlapping triangles.
 The Move Lines tool functions just like the Move Dots tool, except it works on lines. Lines will become highlighted and blink with color, and their
partner lines will do the same in black and white. The same arrow key combinations used to move dots also works to move lines. The Delete key will
also delete a selected line.
 The Select Lines tool functions just like the Select Dots tool, except it works on lines. When dragging a selection box to select lines, only a
piece of the line must be inside the box to be selected. You do not need to drag the box around the entire length of the line.
 Connect Dots will allow a new line to be placed, without creating any new dots in the process. You can either click on a dot, hold the button down,
and drag a line to any other existing dot, or you can click on a dot and let go, then click on another dot. With this tool, you do not need to
drag the mouse all the way to the second dot or click on the second dot. A dotted line will be shown from the first dot to the dot nearest the current
mouse pointer location as you move the mouse around, showing you exactly where the new line will be created. Morpheus Photo Mixer will not allow two lines to
be connected to the same two dots, and attempting to do so will produce no new line.
 Draw Free Line operates similar to Connect Dots, except that you can optionally create one or two new dots in the process of adding a line. Either
end of the line you create can be on an existing dot or in any empty place on the picture, where a new dot will be created. If you
hold Shift with the first click, then only a horizontal or vertical line will be created. When using the Move Lines or Select Lines tools,
Alt+click will add a line, just like it would add a dot when using the dot tools. Though this will require a second click (or a long drag from the
first click) for the other end of the line. Also, Alt+Shift+click will add only a straight horizontal or vertical line.
 Dots and lines can be displayed in a variety of different color schemes, styles, and sizes. By default, dots are set to cycle through a set of
8 colors in a medium sized square shape. Each photo mix in your timeline can be given a different look for the dot's default look in that photo mix.
 Lines can be displayed in a variety of different ways just like dots, except there is no shape selection. By default, all lines are a solid color.
 Triangles can also be customized with all the same choices as lines. All lines are also triangle lines, but when you are viewing both lines
and triangle lines in your pictures, the settings for lines will be used for the lines you placed, while the settings for triangles will be used
for the generated lines which cannot be moved.
 In addition to being able to set a default way to display dots and lines for each photo mix, you can assign specific customization to dots and
lines individually by using the Customize Selected Items option under the Edit menu. While the color scheme option does not apply to customizing
a specific dot or line, there is an additional choice for each option called 'Automatic'. Selecting Automatic for any of the various options will
result in using the default settings for that photo mix.
 Customizing groups of dots or lines individually lets you group them to your tastes, to separate pieces of your work. For example, you could set
all the dots around the eyes in a picture of a face to one color and shape, and set the dots around the mouth to a different color and shape.
 These four buttons on the toolbar will also allow you to customize selected dots and lines, just like the Customize Selected Items option.
You can also use the Page Up and Page Down keys to quickly cycle through eight basic colors for dots or lines. Pressing Shift+Page Up
or Shift+Page Down will cycle through shapes for selected dots as well.

 When you are finished with your photo mix, you will want to render it to a file so you can view it in other programs, upload it to your webpage,
or email it to a friend. Use the Render Timeline button
 If you click and drag a docking pane's title, or click and drag the tab when more than one pane is docked at the same location, you can move the
pane to another location. These buttons will help you dock a pane by allowing you to drag the mouse to either one of the four edge buttons in order
to dock the pane to a particular side of the window, or to the middle button which will dock the pane with an existing pane.
 The window tabs can be clicked and dragged for reordering, or they can be dragged to other groups. Drag a tab to the edges of a group to split the
group in half, creating a new group.
 The Preview window displays one photo mix at a time and is constantly updated as you add or move dots or
lines in the picture windows to show you what the results will look like. Toggle displaying and hiding the Preview window by pressing Ctrl+P.
 The Timeline window shows thumbnails of all the pictures for each photo mix in your layout. You can add additional photo mixes to the timeline by
using the first button on the Timeline toolbar. To open a picture in order to place dots or lines on it,
doubleclick on the thumbnail in the Timeline window. If you doubleclick on the photo mix buttons above the pictures, then both pictures for
that photo mix will be opened side by side. Toggle displaying and hiding the Timeline window by pressing Ctrl+T.
 The Fade Selected Dots button